Before and After 2014: Smile Makeover – Addressing Mid-line Cant and Proportion with Lateralised Canines

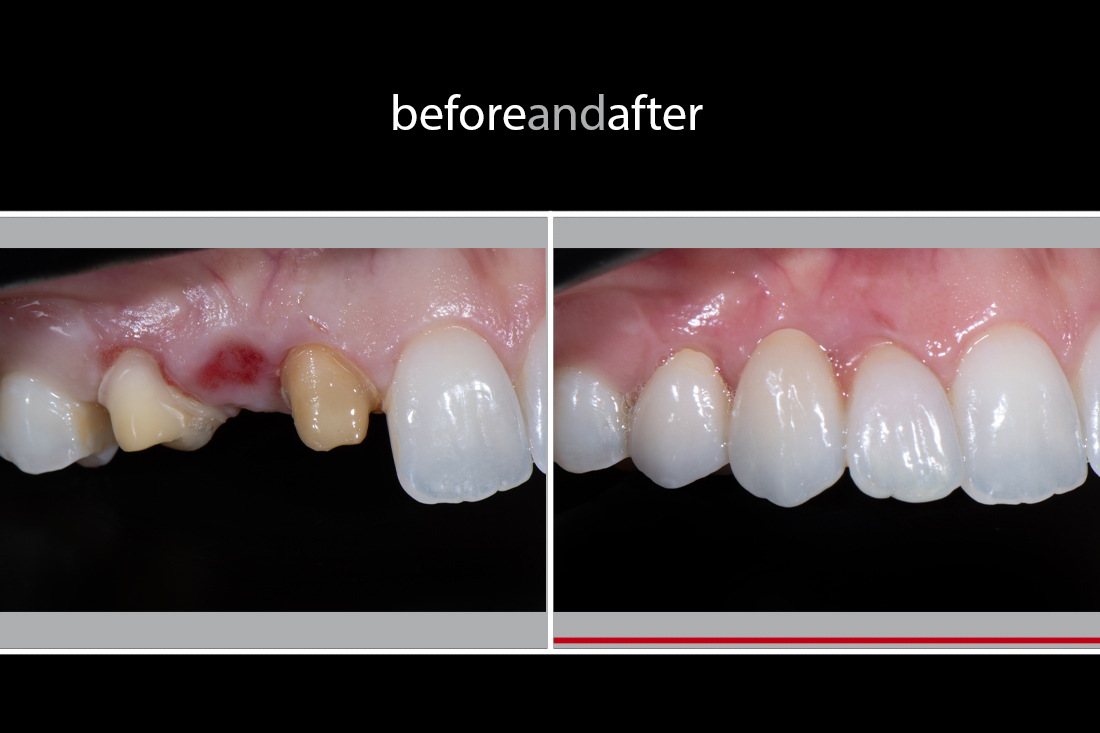
A Middle Eastern female patient was concerned about her smile’s asymmetry, cased by the midline cant and shift with missing laterals. The lateralised canines are as wide as the central incisors, so the overall proportion needs improvement.
It is not visible in the initial smile photo, but the patient has a gummy smile, which she would like to address simultaneously.
When working on a case like this, initial planning is crucial to visualise the outcome from the beginning, and thus, diagnostic wax-up is a must.
We have decided to idealise the gingival level by crown-lengthening/gum-contouring, to begin with, then lithium disilicate (e.max) veneers from 13-23, right upper canine to left upper canine, a total of 6 teeth.


Figs 1-4 show the pre-op condition. The challenge is to make the lateralised canines smaller, and the apply dominance in the first premolar to make them look like canines.

After the initial consultation with the patient, I moved onto the smile design in Photoshop, indicating the gum-contouring amount. There is, however, no need to change the gingival level on 22 and 23, as shown in Fig 5.

We can, of course, use the close-up smile photo cropped/enlarged from the levelled full-face photo, to assess the midline, length, buccal corridor, and dental/cranial distortion, which has no tilt/cant present against the facial features. However, a separately-photographed close-up of the smile can help maintain a clear, high-resolution image with more detail. To assess and adjust the tilt on the separately photographed smile photo, see the following steps.
Step 1: If the full-face photo has a tilt/cant, it needs to be in an upright position. It is ideal for levelling the maxilla to the temporomandibular and cranial base. However, aesthetic evaluation is determined by the individual’s artistic flair. As nobody’s facial features are perfectly symmetrical, we should evaluate the facial midline using facial features, including the glabella, nose, and chin.
Step 2: Draw a cross-shaped diagram, using the dental midline and the tips of the canines as reference points on the full-face and close-up smile photos (Fig 6).
Step 3: Superimpose a full-face photo onto the smile photo (or vice versa) at 50-pre cent opacity, and the cross-moved until they line up (Fig 7). Repeat this process by adjusting the cant of the close-up smile photo, until the cross-shaped diagram matches perfectly. It verifies that the separately taken close-up photos are matched with the levelled, full-face photo. I use Photoshop to edit these featured images/functions, to verify the vertical-horizontal alignments.

Fig 8 shows the study model mounted on the Aesthetic Articulator (click here to read the article), and marked the ideal gingival level. Fig 9 shows the completed diagnostic wax-up, which serve as the blueprint of the outcome.


Figs 10-13 show the completed restorations. I am satisfied with the idealised gingival level, midline position, and overall proportion with the aesthetics of the restorations that met the patient’s desire. For a 2-week post-op, the soft tissue was healing nicely, and everyone was smiling:)
Another great example showing a correction of midline cant is presented in the Technical/Clinical Tips and Tricks section – click here to read.
Acknowledgement:
I’d like to thank Dr Urvashi Pandey from Lotus Dental in Neutral Bay NSW, Australia, for her clinical excellence and attention to detail to achieve the outcome. https://www.lotusdental.com.au/
This case was issued in May 2014 with no remakes.


Pingback: CORRECTION OF A MIDLINE CANT WITH A SINGLE CENTRAL INCISOR - Smile Virtuoso