
QZ featured Yugo’s article titled ‘The Aesthetic Articulator (Australian Patent AU2013100527)’ in June 2015 (published language: German).
Introduction:
Contemporary dentistry is increasingly using digital technology to plan and communicate treatment, and, in many cases, to aid in its delivery. CAD/CAM technology is a prime example of how high tech can be melded into the dental laboratory’s workflow and, increasingly, the dental clinic. This once novel process is now commonplace throughout the mainstream dental community.
Advancements in digital technology have also helped clinician and technician to communicate more clearly and precisely to achieve better patient outcomes, and involve the technician in delivering care.
More and more, technology is also employed to help clinicians understand and deliver on patient expectations. Due to the increasing dental knowledge base held by patients and their desire for beauty, the demand for aesthetic is more significant than ever, and so is the level of scrutiny.
Dental professions are generally attuned to this social trend. However, we must remember that the patient, not the practitioner, is always the ultimate judge of the restoration’s final aesthetic outcome, particularly those in the aesthetic zone.
Although digital technology can provide precision, accuracy and consistency, the human touch still significantly affects the final aesthetic outcome. Technology, artistic flair, scientific knowledge and highly developed clinical and technical skills combine to deliver aesthetically pleasing, functional and durable results for patients. It is, in essence, the ultimate melding of art and science.
The challenge, however, is to bring all of this together to deliver an outcome that will satisfy the patient immediately and for the future, and conform to generally held parameters of acceptable clinical practice.
If not properly managed, there can be a significant difference between what’s presented during the treatment planning stage and the reality of what could actually be achieved with the final result. If we can connect all the dots, then mission accomplished.
Technology can, again, be employed to help clinicians and technicians understand and document patient expectations from the outset and in a manner that is comprehensible to the patient to the point of achieving overall consent.
Whereas creating outcome “simulations” to help visualise the ideal outcome of the proposed treatment is not a new concept in dentistry, the challenge for dental professionals is to deliver on that projected ideal throughout all treatment stages, both in the clinic and dental laboratory.
In inventing the “Aesthetic Articulator”, the author is endeavouring to provide a tool whereby it is possible to visualise the final aesthetic outcome precisely and accurately before treatment commences.
Additionally, providing a reference to aid clinician and technician in ensuring treatment follows the ideal path to match the predicted outcome. In the process, possible errors that might occur at the try-in or insertion phases can be eliminated, adding tremendous value to the current workflow of aesthetic dentistry.
Background to the invention:
The author invented the Aesthetic Articulator based on his own experiences whilst working on many restorative cases to date. They involved dealing with extensively trained, high profile dental clinicians and their patients in aesthetically demanding circumstances, especially in the realm of prosthodontics.
The Aesthetic Articulator is essentially a digital articulator captured in the aesthetic zone.
In an ideal scenario, the manufacturer of the dental prosthesis (dental technician/ceramist) can see how their restorations (including substructure) would look against the soft tissue (gums, lips and face) before dispatch to the clinician.
It is a fundamental process during manufacturing, from a single tooth to an extensive smile makeover case and the diagnostic wax-up at the treatment planning stage.
Current “physical” articulators (the apparatus we are all familiar with) only record hard tissue information such as Facial Indexes (e.g., face-bow etc.). They help level the maxilla on a cranial basis (again, hard tissue) to achieve ideal aesthetics. However, the soft tissues inevitably determine the style/shape and length of teeth and positions, including the buccal corridor, to achieve the ultimate aesthetic result.
The pressure to get things “right” without any error under very tight timeframes is tremendous, leaving little time for mistakes or remaking procedures during the manufacturing process.
The Aesthetic Articulator will increase the chances for the work to be done right the first time, ultimately what the dental professional and their patients are after.
The Aesthetic Articulator may also be utilised by the clinician who has ordered work from a dental technician or laboratory. Not only can the Aesthetic Articulator be used in the quality control process for work received from a laboratory before insertion into the patient’s mouth, but the clinician can also directly benefit from its use at the case planning stage.
The Aesthetic Articulator mounted Diagnostic Wax-up is the most accurate image available to be shown to the patient compared to existing computer imaging dental software on the market.
The Aesthetic Articulator provides the clinician with a higher communication level between themselves, the dental technician and the patient.
One of the critical elements during the manufacturing process is to retain the planned images for the duration of the timeframe and superimpose parts of the manufacturing process onto the prosthesis image at various stages to enable the capture of the correct elements.
This invention assists in benchmarking the Standard of Care protocol from chair-side procedures and extending it to the Standard of Care in all products and services provided to the patient in prosthodontics.
Prototyping commerciable workflows:

Fig 1 details a commerciable workflow. The name “Aesthetic Articulator” refers to the software. The software design and specification incorporates details such as the scope of the frame, colour variations, the number of elements within each image – e.g., gums, teeth (incl. restorations), lips, measurements and dimensions of the features uploading, manipulation and storage of images.
The scanning component isn’t a part of the invention as it is already on the market, which can be achieved with currently available and well-understood technology.


With the current workflow (Fig 2), the name “Aesthetic Articulator” refers to the following:
- developed digital images with the use of a Digital Single Lens Reflex (SLR) Camera,
- Zirkonzahn Tripod
- Adobe Photoshop (Fig 3), and
- The process of mounting the 2-dimensional images on 2-dimensional image overlays utilising these three essential items above (or equipment that includes similar features).
The advantage of utilising the current workflow is to enhance the clarity of the 2-D images on 2-D image overlay rather than scanned 3-D objects on 2-D image overlay for more of an accurate/precise mounting position with better detail.
Concept – Step by Step:

The Aesthetic Articulator concept follows mounting the 3D image of the scanned model on the close-up smile photo.
Currently, 2d Photographs with Zirkonzahn tripod are edited in Photoshop by adjusting the position of the model little by little, mimicking the 3D effects – an extremely time-consuming process (but worth it!) (Fig 5).
There is already existing CAD technology to provide 3D model scanning, and the scanned model needs to be uploaded then positioned on the 2D photograph precisely using the surround hard-tissue information.
Note that the soft tissues (incl. facial features, gums and lips) are not reliable reference points for accurate mounting.

Fig 6 highlights the hard-tissue information in blue. The unprepared/untouched dentitions (incl. existing restorations) are the most accurate hard-tissue information to rely on and imply as the reference point.
The dental midline is also a helpful reference point (though it is invisible on a prepped model).
This position can be manually marked using the lower dentition in the occluded position (good hard-tissue information) as a reference point.
Here are the model mounting steps on the Aesthetic Articulator:
STEP 1: Open the photo files of the pre-op model (Fig 4) and smile (master image) in Photoshop (Fig 7).

STEP 2: Click on the photo of the pre-op model. Use the ‘Quick Selection Tool’, select where the model is (excluding the background) (Fig 8).
STEP 3: Select ‘Move Tool’, then overlay the selected area from the pre-op model photo onto the smile photo (Fig 9).

STEP 4: Resize the captured image (press ‘command’ key + ‘T’ to select the image, then hold the ‘shift’ key, resize from the corner of the image) to match the maxilla’s size seen in the close-up smile photo. 50% opacity (in a range of 0-100%) is applied to make the overlaid image 50% translucent. The hard-tissue’s original position on the master image can be visible through the overlaid image (Fig 10).
STEP 5: When the model of the dental arch is kicking up (or down) in comparison to the reference points seen in the master image, the “Pitch” is not correct, so it needs to be adjusted accordingly (Fig 11).

STEP 6: The “Pitch” seems roughly correct, but one side is higher than the other in comparison to the reference point, indicating the “Roll is not accurate, so it needs to be adjusted accordingly (Fig 12).
The “Roll” is the only distortion that can be fixed/addressed in 2D images without the need for adjusting the position of the model on the tripod.
STEP 7: When the dental midline is lined up, and one side of the buccal corridor seems wider than the other against the reference points, the “Yaw” is incorrect, so it needs to be adjusted accordingly (Fig 13).

STEP 8: Fig 14 & 15 show the mounted model to the exact position seen in the close-up smile photo. Once this process is completed, the model’s position must be secured and maintained on the tripod.
Assessment of the Pre-op Condition and Vertical-Horizontal Verification:


The patient is a 40-year-old dentist from Darwin with a history of bruxism, erosion, abrasion and thinned out enamel on the anterior teeth with a flared out incisal edge position (Fig 16-19). A 6-unit anterior smile makeover is agreed upon to re-establish good canine guidance with an aesthetically pleasing outcome.


The Smile Design can be done either by the clinician or the ceramist/technician based on a good set of digital photographs. The full-face photo (Fig 20) and a close-up of smile photo (Fig 16) help determine the following:
- the ideal length of teeth and proportion
- pitch/roll/yaw
- the fullness of arch – buccal corridor
- suitable style/shape based on the facial features
- smile-line and gum-line
These featured images/functions are currently edited in Photoshop to verify vertical-horizontal alignments.
If the full-face photo has a tilt/cant, as shown in Fig 20, it needs to be in an upright position (Fig 21). It is ideal for levelling the maxilla to the Temporo-mandibular Joint (TMJ) and cranial base; however, the aesthetic evaluation comes down to the individual’s artistic flair. Since no facial features are perfectly symmetrical, the facial midline should be determined using the full facial features, including the glabella, nose and chin.
It is ideal to use the close-up smile photo cropped from the adjusted/levelled full-face image because there is no tilt/cant present against the facial features. However, a separately photographed close-up of the smile (Fig 16) can help maintain a clear, high-resolution image.
To assess the cant on the separately photographed smile photo, the following features are used as the reference points (Fig 22 & 23).
- dental midline (incl. the cant); and
- tips of the canines
Fig 24 shows horizontal/vertical relationship verification, levelling the separately taken smile photo against the close-up smile photo. The balanced full face image is superimposed on top of the smile photo, using the 50% opacity feature while adjusting the scale/size and cant until those three reference points match up.
Diagnostic Wax-up:

A diagnostic wax-up is an essential planning/designing tool to establish an ideal outcome achievable for the individual patient on any smile makeover case.
Utilising the Aesthetic Articulator delivers the most accurate digital images available at the planning/designing stage.
The Aesthetic Articulator serves as a communication tool between dental professionals and patients to carefully plan the desired shape, visualising the outcome.
The process eliminates delivering an incorrect length, midline, style/shape, buccal corridor width and any possible distortion that could occur with the traditional diagnostic wax-up method.
Smile Design starts with establishing the midline’s ideal position and the length of the central incisors (Fig 25). By drawing a line on those elements, it creates a point where the lines cross over, considered the starting point of Aesthetic Dentistry.
After the pre-op model is mounted on the Aesthetic Articulator, the same method shown in the concept stage (Fig 4-15), the diagnostic wax-up is now completed. Since it is visible how the wax-up looks within the smile window during the process, necessary adjustments can be easily made until the desired outcome is achieved.
Fig 26 shows the completed wax-up against the pre-op smile at 50% opacity.
This image can be assessed clinically to determine where and how much to prep, especially length-wise.

Fig 27 shows the completed wax-up against the pre-op smile at 100% opacity. The image indicates that the correct tooth position and length are achieved.
To assess the lip-line position, the overlaid image can be easily manipulated digitally by cutting out the diagnostic wax-up model above the bottom line of the upper lip with the ‘Eraser Tool’ (Fig 28).

Since this is a 6-unit anterior case, unnecessary areas can be erased, leaving only where the wax-ups are within the smile window (Fig 29).
The image gives dental professionals a great indication that the proposed shape meets their patient’s expectations. However, the colour is way off from the rest of the dentition, so it is not as presentable from the patient’s perspective.
The colour can also be digitally altered by double-clicking the layer and select ‘luminosity’ in blend mode and then adjust the colour accordingly until it blends in with the rest of the dentition (Fig 30).

Fig 31 shows the completed diagnostic wax-up on the Aesthetic Articulator.
Fig 32 shows the temps in situ – see the similarity between virtual vs reality.
As shown above, the result speaks for itself – successfully delivers an identical outcome between what was planned and delivered.
Manufacturing Process:

Once the prep model is mounted on the Aesthetic Articulator, the restorations can be assessed at any stage during the manufacturing process.
Figs 33-34 show the prep model on the Aesthetic Articulator. Applying different opacity helps with assessing the amount of preparation made by the clinician.

It is essential to check the appearance of restorations while establishing the sub-structure or wax-up stage.
Figs 35-36 show the completed wax-up to proceed with IPS e.max® restorations (Ivoclar Vivadent). This is the blue print of the final restorations, so it is essential to ensure that the desired outcome is achieved at each manufacturing process.

Figs 37-38 show the restorations at the biscuit-bake stage on the model, then mounted on the Aesthetic Articulator to ensure that they are accurately aligned.
The models are digitally erased at the margin better to assess the gingival level against the soft tissue.
Completed Restorations:


Figs 39-41 show the completed restorations virtual try-in images on the Aesthetic Articulator. The images can be manipulated digitally to make a suitable assessment before the dispatch of the case to the treating clinician.
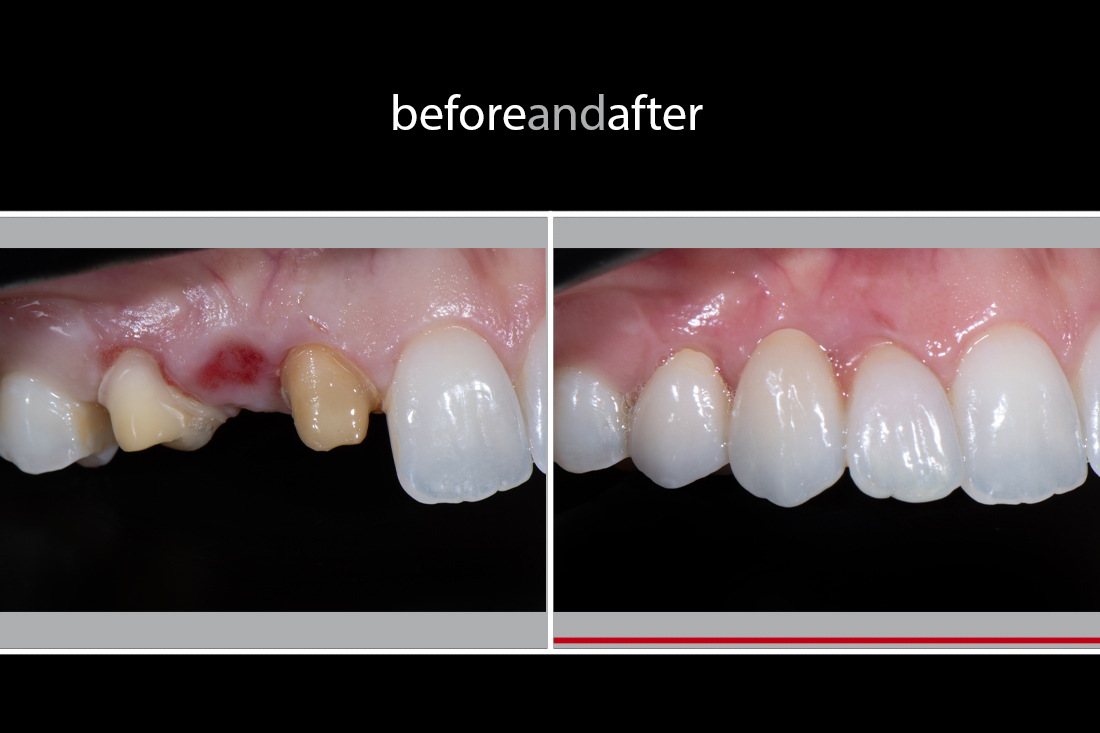
Fig 42 shows the completed restoration in situ – post-op close-up smile. Note the consistency from Fig 31 (diagnostic wax-up virtual try-in), Fig 32 (temps in situ), Fig 41 (completed restorations virtual try-in) to Fig 42. We can now connect the dots and provide the predictable outcome with precision as presented herein.
Testimonial from the Patient (a Dentist):

“ I am a dentist with post-graduate qualifications in Prosthodontics. I know how hard it is to make anterior ceramic restorations blend in to become inconspicuous and imperceptible from natural dentition. I was after a ceramic smile makeover but could never commit to having my teeth prepped until I noticed Yugo’s articles in dental publications.
Yugo’s publications and career development were followed over 2 years before I finally decided to contact him and get going with my own aesthetic makeover. I knew what I wanted, and I felt Yugo could deliver.
Orthodontically, I would be classed as Bimaxillary Prognathism with flared out anterior teeth. Trauma-related devitalised upper right central incisor, coupled with chipped incisal edges and erosion all played a role in the negative appearance.
After initial discussions, preoperative study impressions and pictures were sent to Yugo for diagnostic models and wax-up. Yugo is based in Sydney, NSW, whilst I am in Darwin, NT, Australia. It was impossible for me to go and see Yugo personally, so communication was confined to mostly emails.
Yugo was given specific instructions on my desire to create an illusion of straight looking teeth. I wanted the incisal edges of the canines, and lateral incisors tucked in lingually, and the central incisors lengthened. The canines were to be waxed-up to re-establish a canine-guided occlusion.
Because of the distance separating us, there was no way of knowing if the diagnostic wax-up was right for me or not, or whether the new proposed shape of teeth even blended in with the rest of the smile window and facial profile.
I was specific in what I wanted, and Yugo’s determination to deliver and ensure all went well led to his amazing invention. Using this new approach, he was able to confidently undertake and modify the diagnostic wax-up to overlay onto my own pre-operative pictures to verify and validate the proposed changes.
The teeth were very precisely prepared by Dr Clarence De Silva in Sydney and the temporary veneers were fabricated using the accurate stent produced from the wax-up. The final shape, profile and proportions were all achieved in the first go, as evident in pictures at the temporary phase.
The final results have been nothing short of amazing. I wanted a set of restorations that no one could pick out in an instance, and that is what Yugo gave me.
It has been nine months since the final restorations were placed, and even now, I am complimented by my own patients on how naturally beautiful my own smile is and the requests for the same.
I am thankful to Dr De Silva for his clinical excellence and am grateful to Yugo for his prosthetic excellence.
Yugo’s new approach has been adopted into my own prosthodontics protocol. The new protocol will find its place in not only cosmetic dentistry but also in the rehabilitation of advanced tooth wear using fixed / removable prosthetics. I can even see its applications in implant prosthetics involving full arch reconstructions.
Thank you very much Yugo, for your innovation and contribution to the improved predictability of the diagnostic wax-up protocol. This protocol will save expensive remakes.
Dr Anand Patel, BDS, M.Clin.Dent (Pros) (Dist)”
Postscript:
Wow, it’s been eight years since the granted of the innovation patent. There is no doubt that it has been a pivotal moment in my career to date and has changed how I approach the smile makeover cases with absolute confidence and accuracy/precision.
Behind the scenes story:
I forgot to take the full-face photo (Fig 43) before the publication back in 2013, so I had to fly all the way to Darwin – where Dr Anand is based – just to take that one photo!!! Hahaha!
It, however, turned out to be such an incredible trip. Dr Anand was kind enough to show me around Darwin, and I really enjoyed it. I also appreciate his family’s company and made me feel so welcomed.


Pingback: Yugo – the man behind Smile Virtuoso: Past - Present - Future - Smile Virtuoso
Pingback: Before and After 2014: Smile Makeover - Addressing Mid-line Cant and Proportion with Lateralised Canines - Smile Virtuoso
Pingback: Before and After 2013: Smile Makeover - Implant Zirconia Bridge with Gum Porcelain - Smile Virtuoso