
eLABORATE Magazine featured Yugo’s article titled ‘Unbreakable Zirconia Abutments: New Lava and NeoLink Zirconia Abutments’ in Jan/Feb 2010 (published language: English).
Introduction:
Strength and aesthetics are foremost in the mind of today’s ceramist. The longevity of restorations has always been an essential factor. In the past, however, aesthetic compromises may have been tolerated, particularly in the posterior region. Thankfully today, achieving a lasting, highly aesthetic result technically has become far more accessible due to the development of new technology and materials.
In the burgeoning field of implant dentistry, to maximise aesthetics, it is essential to create a customised abutment instead of using ‘off the shelf’ abutments. Custom abutments are necessary to control the emergence profile, as well as the Sub-Gingival Contour (SGC).
Customised Zirconia abutment has emerged on the market; however, it’s the strength of the abutment depends on the strength of the zirconia where the force of the clinical screw is applied. Studies suggest that it is ideal to have the torque-force on the mental abutments as traditionally exercised, rather than the zirconia structure.
In this article, I’d present the process of fabricating Lava and Neoss NeoLink™ Zirconia Abutments with titanium structures – a combination of aesthetics (Zirconia) and strength (Ti interface).
Case Study 1:

To create the abutment, Lava Zirconia is cemented onto a prefabricated titanium abutment (Ti-interface). Cementing onto gold is not recommended by 3M ESPE at this stage until further testing is conducted due to mechanical and physical surface area variations. The abutment head is cemented to the interface without creating torque pressure to the zirconia, which makes the abutment almost unbreakable. This method provides compatibility with a wide range of implant systems. Additionally, lava Zirconia comes in 8 different shades, which benefits the aesthetic result.
Figure 1 shows the 3i Certain Gingihue Post (Titanium), adjusted to a suitable height. For secure cementation of the zirconia abutment head to the titanium interface, the interface needs to meet the following specifications:
- Cylindrical shaped interfaces made of titanium or titanium alloys approved for dental applications;
- Overall cementation surface area (i.e., cylinder barrel + Cylinder flange) should be greater than 33.0mm2;
- Cylinder diameter should be wider than 2.9mm;
- The outer diameter of the titanium interface should be wider than 4.5mm; and
- Cylinder height should be between 2.6 and 6.0mm.
Figure 2 shows the wax-up of the abutment over the titanium cylinder. The thickness of the wax-up should not go below 1mm for the adequate strength and aesthetics of zirconia.

The cylinder and the wax-up will be scanned at different stages (Fig 3); hence it is essential to have the wax-up removable. Fig 4 shows the cement gap between the post and abutment. A reduced cement gap could prevent rotation of the zirconia abutment as it tends to come out slightly loose when scanned over metal coloured objects with the CAD/CAM spray.

Spruing of the restorations should be just above the margin (Fig 5), and this should be almost always the case with the Lava system. Once the fabrication of the abutment is completed (Fig 6), the fit has to be checked on the cylinder. The emergence profile of the zirconia framework should be polished before the cementation so that excess cement can be removed easily.

Both titanium and zirconia surfaces are sandblasted with aluminium oxide (Fig 7 & 8). It is recommended to cover the polished surface with wax to protect it from being sandblasted. The screw path on the titanium cylinder must also be blocked with wax so that the excess cement won’t go inside the screw channel during the cementation process. An alloy primer and a zirconia primer should be applied respectively for better bonding strength.

Rely X Unicem 2 Self-Adhesive Universal Resin Cement is recommended for cementation. In this case, the Clicker dispenser is used, and this would be the most suitable delivery method for the lab as only hand-mixing is required without any equipment (Fig 9). The Clicker delivers pre-measured amounts for consistent, smooth and economic mixing. It is important to note that the mixed cement should be applied on both the zirconia fitting surface (Fig 10), as well as the Ti interface.

The two pieces then pressed firmly with a finger (Fig 11). Pre-polymerization can be done using a tabletop lamp or a handheld light-curing unit for 10 seconds so that excess cement can be moved easily (Fig 12). Final Polymerization is recommended under proper equipment such as 3M ESPE Visio Beta Light Curing Unit using program 1.
Final Restorations:

Fig 13 shows the completed Zirconia abutment cemented onto the Ti interface. The transfer jig ensures the proper positioning of the abutment placement without clinical difficulty (Fig 14).

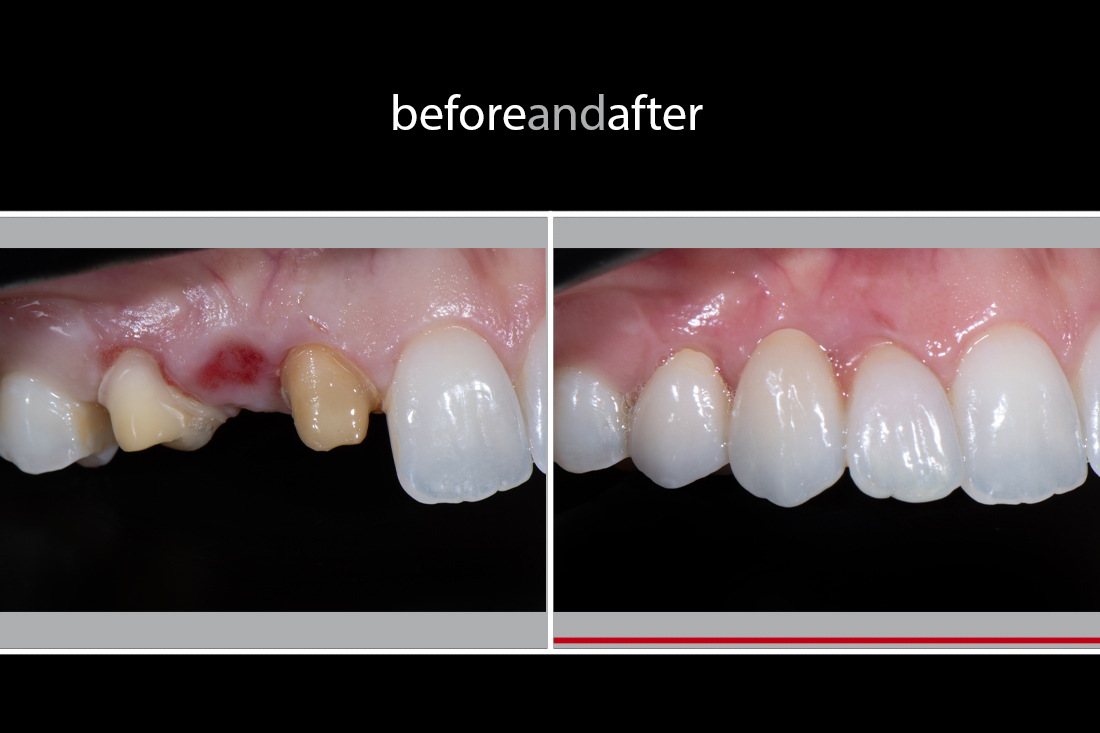
Fig 15 shows the abutment in situ, showcasing the aesthetics of Lava Zirconia Ti interface abutment. The opacity of Lava Zirconia is close to the dentin of the natural dentition, which helps in achieving aesthetically optimised restorations. Fig 16 shows the immediate try-in image of the final restoration. The patient then accepted the case, so it was issued. After receiving feedback from the clinician and looking back at the case, a better result could have been achieved by reducing the height of the titanium collar to push the soft tissue out buccally from a deeper level. The Certain Gingihue Post should have been modified before designing and scanning of the abutment.
Case Study 2:
The technique shown above is compatible with a wide range of implant systems. Case Study 2 illustrates an example of using the Neoss Neolink abutment on a Nobel Replace (Nobel Biocare) abutment.

Neoss provides a range of titanium abutments that are compatible with Nobel Biocare abutments and some Straumann abutments. The height of the titanium collar is very minimal; hence we can exercise full control over the emergence profile as well as the Sub Gingival Contour (SGC) without modifying the titanium component, a key benefit of using the Neoss system. Fig 17 and 18 show the completed waxed-up abutment on the Ti interface.

Fig19 shows the modified Ti interface – a flat surface is created as an anti-rotation mechanism so that the location between zirconia and titanium structure is accurately defined. In the Neoss system, ensure that the clinical screw is accessible after the fabrication of the Lava/Neoss NeoLink Zirconia abutment as the size of the clinical screw is slightly larger than the lab screw so some slight adjustment in the access hole might be necessary. Fig 20 shows the milled and sintered Lava Zirconia abutment.

The same cementation procedure is carried out as shown in the Case Study 1 above to complete the abutment (Fig 21). After the fabrication of the final restoration, it is ready for a try-in (Fig 22).
Final Restorations:
Fig 23 and 24 show the try-in of the abutment. Note the improved fullness of the soft tissue compared to Case Study 1.

Fig 25 shows the try-in image of the final restoration, which was accepted by the patient and the clinical. Fig 26 shows the final restoration of 2-week post-op. The soft tissue is healing nicely, and the redness around the tissue will settle with time.
All in all, it is a satisfying aesthetic result with durable restorative materials, which gives us a peace of mind – knowing it’s going to last a very long time.
Acknowledgement:
The author wishes to thank Brisbane-based prosthodontist, Dr Tony Rotondo, for his outstanding knowledge and skill from both a clinical and technical perspective and the contribution of the clinical photographs.
Reference:
Lava Zirconia for Implant Abutments – Cementation and Sterilization Made Easy – 3M ESPE 2008
https://multimedia.3m.com/mws/media/515083O/3m-lava-zirconia-for-implant-abutments-handling-guide.pdf
Postscript:
It’s been over ten years since I published this article. The technique presented above was considered innovative but somewhat sceptical at that time. Today, I still use the very same protocol (with a broader range of Ti interfaces), and it has become the norm within the realm of aesthetic implantology.
I’m proud of myself with the fact that I have made a contribution and was a part of the development of advancement in this field. Neoss also featured my work shown in this article in their international promotion booklet in 2010 – see below.


Pingback: Before and After 2019: Missing Tooth Replacement on Lateral Incisors (Part 1) - Smile Virtuoso