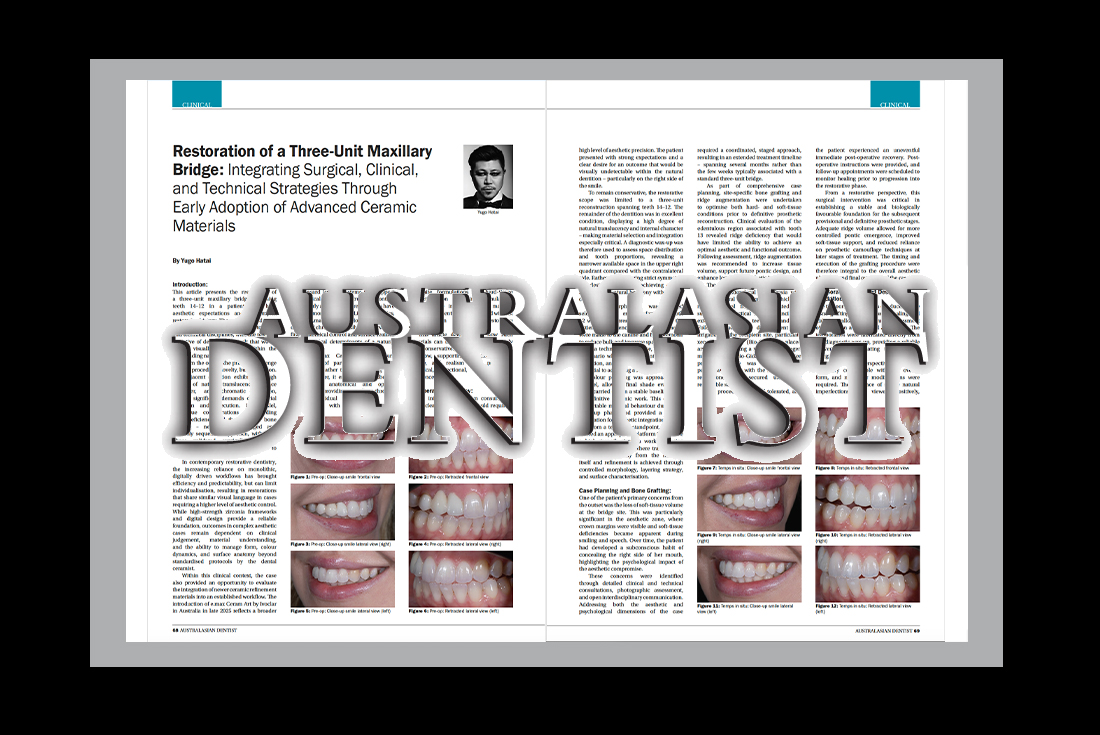
Refractory Veneers – Preserving the Art of Hand-Made Aesthetics

Introduction:
While zirconia has rapidly become the leading material for strength, predictability, and CAD/CAM efficiency, refractory feldspathic veneers continue to offer unique advantages in specific situations. They are most valuable in the aesthetic zone, where preserving natural tooth structure and achieving the highest level of colour control are paramount.
This technique is particularly suited to cases requiring ultra-thin restorations, minimal preparation, or where stump shade plays a critical role in the final outcome. It is also considered when the treating clinician’s philosophy favours conservative approaches that respect the original tooth anatomy.
Unlike modern digital workflows, refractory feldspathic veneers are fabricated entirely by hand. Every layer is carefully built and customised, requiring a high degree of skill and artistry. For this reason, the technique is both challenging and rewarding, representing the pinnacle of traditional ceramic craftsmanship.
As dentistry moves further into digital design and automated production, the refractory method reminds us that there are times when only the handmade approach will deliver the desired balance of aesthetics, precision, and conservation. It is this philosophy that underpins my work and why I continue to teach and practise the refractory veneer technique — not only as a solution for select cases, but also as a legacy for younger generations of dental professionals who may wish to master this demanding craft.
Case Study 1: Dentistry by Dr Tony Rotondo (Rotondo Clinic, Brisbane, QLD, Australia)


The first case illustrates what initially drew me into mastering the refractory veneer technique (Figs. 1 and 2). The treating clinician specifically requested refractory feldspathic veneers, leaving me no option but to fully commit to the process. At the time, I had little exposure to the method, but this case became the foundation of my understanding and appreciation for the craft.
The patient presented with microdont lateral incisors requiring minimal preparation and maximum preservation. To optimise the outcome, bleaching and crown-lengthening were carried out prior to veneer placement (Figs. 3 and 4).
These restorations (12 and 22) were completed more than 15 years ago and remain one of my earliest experiences using the technique. If presented with the same situation today, I would most likely choose lithium disilicate (such as e.max) for its strength and reliability. Nonetheless, I am grateful for having taken on this challenge, as it provided me with a skill set that continues to be valuable in unique cases where refractory veneers are still the optimal choice.


As with any restorative technique, refractory veneers carry distinct advantages and limitations that must be considered in treatment planning:
Positives:
- Unmatched aesthetics with ultimate colour control
- Flexible restoration thickness (0.1 mm – 2.0 mm)
- Suitable for partial restorations
- Cost-effective, with no substructure required
Negatives:
- Limited strength (up to 120 MPa)
- Time-intensive model fabrication
- Difficult to verify colour against adjacent natural dentition (techniques such as eLAB or Matisse are not applicable)
- Requires high technical skill, meticulous attention to detail, and a strong sense of predictability
The final outcome (Figs. 5–8) was both satisfactory and aesthetically pleasing. More importantly, this case shaped my development as a ceramist and reinforced the principle that while modern ceramics and CAD/CAM dominate today’s workflows, there remains a vital role for traditional, handmade artistry when aesthetics, conservation, and precision are paramount. The significance of this case was later recognised in print, being published as part of a book chapter in Prep Veneers & Non-prep Veneers (2010, Quintessence Publishing).
Case Study 2: Dentistry by Dr Andrew Chio (Arawatta Dental Care, Carnegie, VIC, Australia)


Case Study 2 presents a situation where refractory feldspathic veneers were, in my view, the only suitable option. The patient presented with a challenging aesthetic case involving the four maxillary incisors (12–22) (Figs. 9–11). The primary objective was to preserve as much of the natural dentition as possible.
To achieve this, absolute minimal preparation was undertaken: conservative reduction on the laterals (Fig. 12) and no preparation at all on the centrals. This approach maximised enamel preservation, ensuring optimal bonding strength while also allowing for superior colour control — both critical factors in the final aesthetic outcome.


Figs. 13–15 present the completed restorations on the master model and separately. As shown, the veneers are extremely thin and delicate, which demands extra care in both the laboratory and clinical phases. Handling, finishing, and cementation all require a meticulous approach to avoid fracture or distortion.
While alternative materials such as lithium disilicate could have offered higher flexural strength, they would have necessitated greater tooth reduction — particularly on the central incisors. Such an approach would have compromised the core principle of this case: maximum preservation of natural dentition.


Figs. 16 and 17 show the immediate result after bonding/cementation and the two-week follow-up. The close-up retracted views further demonstrate the integration and aesthetic quality achieved (Figs. 18 and 19).
Only refractory feldspathic veneers were capable of delivering the desired combination of ultra-thin restorations, precise shade characterisation, and conservative preparation. This case highlights not only the clinical value of refractory veneers in carefully selected scenarios but also the high level of technical skill required to fabricate and manage them successfully.

The transformation is clearly evident when comparing the pre- and post-operative smiles (Figs. 20 and 21). Beyond the obvious improvement in aesthetics, the case reinforces a fundamental principle: material selection should never follow trends alone, but must instead be guided by the unique demands of each patient.
Though often considered an “old school” method, refractory veneers continue to hold irreplaceable value in minimally invasive dentistry. The significance of this case was later recognised in Labline Magazine (2016) in the article Smile Bible, under the section on material selection available here.
Case Study 3: Dentistry by Dr Knox Kim (Dental Clinic @ World Tower, Sydney, NSW, Australia)


Case 3 represents a local patient from Sydney, where I was fortunate to be directly involved from the pre-operative stage (Figs. 22–27). I was asked to advise on the most suitable treatment plan, focusing particularly on preparation design and material selection.
The patient presented with a history of trauma to tooth 21 (left central incisor). Our priority was to remain as conservative as possible, recognising the possibility that the tooth could become non-vital in the future. For this reason, I recommended a refractory feldspathic veneer with an ultra-conservative facial preparation that would also restore the missing incisal edge. Both the patient and the treating clinician agreed with this plan.
In cases like this, there are often multiple options presented to the patient. Some clinicians may suggest a full crown on 21, while others argue for treating both central incisors simultaneously, citing the challenge of matching a single tooth. In my opinion, these approaches can sometimes prioritise convenience for the operator over the long-term interests of the patient.
This is where clinical and technical philosophy becomes critical. Ultimately, it is the patient who must live with the consequences of the treatment chosen, and our responsibility as dental professionals is to preserve as much of the natural dentition as possible. Having the skill set to deliver such conservative solutions — in this case, through the refractory feldspathic veneer technique — requires years of technical training, precision, and an uncompromising eye for detail.
Model Fabrication:
The fabrication of the refractory model is one of the most technically sensitive and time-consuming aspects of this technique. Precision at this stage is critical, as the quality of the refractory model directly determines the accuracy and fit of the final restorations. Unlike CAD/CAM workflows, where digital accuracy can be verified and adjusted virtually, the refractory method relies entirely on manual craftsmanship, leaving no margin for error.
Several meticulous steps are required to complete the model, each demanding care and attention to detail. Any compromise in this process — whether in the pouring, trimming, or surface conditioning — can translate into inaccuracies in the final restoration.
The following steps outline the workflow for refractory model fabrication as follows:

Step 1: Mark the section lines with a pencil (Fig. 28).
Step 2: Separate the interproximal margin from the adjacent teeth using a sharp blade (Fig. 29).

Step 3: Section the target abutment with a diamond disc (Fig. 30).
Step 4: Trim the margin roughly with a tungsten carbide bur (Fig. 31).

Step 5: Mark the root shape mesially and distally with a pencil (Fig. 32).
Step 6: Section along the marked line with a diamond disc (Fig. 33).

Step 7: Trim the margin precisely using a silicone wheel (Fig. 34).
Step 8: Finalise the root/cone shape with a tapered tungsten carbide bur (Fig. 35).

Step 9: Apply relocation grooves on both the mesial and distal aspects (Fig. 36).
Step 10: Complete the master single die, touching up with wax as required (Fig. 37).
First Duplication:


The completed master single die is then duplicated to create a working model suitable for refractory veneer fabrication. Accuracy at this stage is critical, as the quality of the duplication directly determines the precision of the refractory die.
Fig. 38 shows the process of duplicating the master die. A high-quality duplicating material should always be used — in this case, Wirosil from Bego (Fig. 39). Once the impression is taken, a debubbliser is applied to minimise surface defects (Fig. 40). The mould is then poured with high-quality dental die stone, such as ResinRock from Whipmix, to produce a stable and accurate replica (Fig. 41).
It is essential to repeat this process to obtain two sets of single dies. The first die is required for embedding into the impression during the fabrication of the master working model, while the second die will undergo further duplication to create the refractory die. This ensures that both the working model and the refractory model can be produced with precision, accuracy, and interchangeability.
Fabrication of Master Model:
Once duplication is complete, the next stage is the fabrication of the master model. This model serves as the primary working model, where the single die made of dental die stone (both master and duplicated) and the refractory dies can be interchanged as required throughout the workflow.
Precision at this stage is vital, as the master model becomes the reference point for proximal contacts and occlusion. Any inaccuracies introduced here will affect the quality of the final restoration.
The following steps outline the fabrication of the master model:

Step 1: Apply denture wax as a spacer, leaving the relocation grooves uncovered (Fig. 42).
Step 2: Place the die into the impression (Fig. 43).

Step 3: Apply Vaseline as a separator along the relocation groove and around the margin (Fig. 44).
Step 4: Secure the die in the impression using sticky wax and a small amount of super glue (Fig. 45).

Step 5: Apply accelerator to harden the super glue (Fig. 46).
Step 6: Apply debubbliser to the impression surface (Fig. 47).

Step 7: Air-dry the impression after applying the debubbliser (Fig. 48).
Step 8: Pour the first layer of dental die stone, ensuring the single die is not fully covered at this stage (Fig. 49).

Step 9: Apply denture wax at the bottom of the die to allow easier access later (Fig. 50).
Step 10: Lightly wet the model with water to prepare the surface (Fig. 51).

Step 11: Pour the second layer of dental die stone to cover the bottom of the model (Fig. 52).
Step 12: Steam clean the denture wax to gain access to the single die, then tap gently from the bottom to remove it (Fig. 53).

After completing all the steps, the working master model is finalised (Fig. 54). This model now allows for the interchangeable use of both the master/duplicated stone dies and the refractory dies throughout the veneer fabrication process.
Second Duplication:
The first duplication was carried out to produce a stone die to embed into the impression for the fabrication of the master working model as shown previously. However, a second duplication is also required. This step ensures that an additional stone die is available, which will then undergo duplication to create the refractory die.
The process mirrors many of the steps used in the first duplication, but at this stage, the purpose is different — it provides the foundation for producing refractory dies capable of withstanding repeated porcelain firing cycles. The precision of this second duplication is therefore essential to the stability and long-term accuracy of the final restorations.


Once the second stone die has been obtained, it is prepared for duplication into a refractory die. Fig. 55 shows the marking of the margin, followed by the application of die spacer, leaving a 1 mm gap from the marked line (Fig. 56). This spacing is essential for accurate seating and cementation of the final veneer.
The die is then duplicated using the same high-quality duplicating material as previously described (Fig. 39). After the impression is taken out from the mould, a debubbliser is applied, followed by air-drying to minimise surface irregularities. The mould is then poured with a refractory die material (Fig. 57).
Traditionally, refractory dies were made with materials compatible only with porcelain-fused-to-metal (PFM) systems. However, for my workflow, I use a more advanced refractory investment — Nori-Vest Zirconia from Noritake (Fig. 58). This ensures compatibility with the latest ceramic veneering systems I employ, such as Noritake CZR (Noritake) and/or e.max Ceram (Ivoclar Vivadent), ensuring both accuracy and material synergy with modern techniques.
Preparation of Refractory Die:


Once the refractory die has set, it must be carefully prepared before the ceramic layering process begins.
First, the margin is clearly defined with a refractory pencil (Fig. 59). Next, the die is trimmed at the base to minimise its physical size (Fig. 60). Reducing the bulk of the die improves heat retention and consistency during ceramic firing.
A small pinhole is then created at the bottom of the die (Fig. 61). This allows the die to be secured more easily onto the ceramic tray, ensuring stability throughout multiple firing cycles.
Finally, the refractory die undergoes degassing (Fig. 62). This step eliminates impurities within the die material, preventing unwanted reactions during firing and ensuring a clean bonding surface for the porcelain. At this point, the refractory die is complete and ready for the layering stage.
Completed Models:


At this stage, the consistency of the workflow can be clearly appreciated across different model types, each serving a specific purpose. Starting from the intra-oral retracted pre-operative photo (Fig. 63), the sequence demonstrates the importance of maintaining accuracy and interchangeability throughout the process.
The solid model (Fig. 64) is used for checking proximal contacts and occlusion after the veneer has been completed. The master working model with the original dental stone die (Fig. 65) allows verification of marginal integrity and internal fit of the final veneer. Finally, the refractory die (Fig. 66) provides the platform for ceramic layering and fabrication, ensuring that precision is preserved from the initial stages through to completion.
Each of these models plays a distinct role, yet all remain consistent with one another, reinforcing accuracy across the workflow. With this foundation in place, the case is now ready to progress to the ceramic layering stage.
Porcelain Build-up/Ceramic Layering:
Over the past 20 years, I have published numerous articles, yet I have rarely shown my porcelain build-up technique in print. This has never been due to secrecy, but rather because the process can appear somewhat “messy” and difficult to communicate with the precision it demands unless demonstrated physically in a hands-on course.
That said, refractory veneers are all about artistry in layering, and this case provides the opportunity to share my approach step by step. What follows is not only a technical workflow but also a glimpse into the craft that elevates this traditional technique to a high-end form of ceramic artistry.
For this particular case, I will be demonstrating the porcelain build-up process in detail. This includes not only which ceramics and liquids were selected, but also the results after each firing cycle, along with the colour mapping strategy applied.
By breaking the process down into these stages, the workflow becomes easier to follow — showing how the choice of materials, layering sequence, and firing discipline come together to achieve the desired outcome. This is where the precision of refractory veneers truly reveals itself, balancing the technical mastery with the artistic flair.
Wash Firing:


The purpose of the wash firing is to seal the refractory die and create a stable foundation for the porcelain layering process. Before applying the ceramic, the die should be soaked in distilled water for approximately five minutes. This ensures adequate water retention and moisture control, which in turn improves the handling of the layering ceramics.
For this case, I kept the wash simple by using Noritake CZR LT 0 combined with Noritake Meister Liquid (Figs. 67–68). The wash layer should always be applied thinly and evenly to avoid unnecessary thickness. The firing temperature is set approximately 25–30 °C higher than the dentine program to achieve proper sealing and establish a reliable foundation (Figs. 69–70).
In retrospect, if I were to repeat this case today, I would select LT X instead of LT 0. This would help retain adequate value while maintaining translucency with a neutral shade — offering an even more refined starting point for subsequent build-up.
1st Dentine/Enamel Build-up:


The first build-up aims to establish the basic internal structure, without focusing on finer details at this stage. I typically use a single dentine colour to shape the internal dentine framework. As a general rule, when in doubt, it is always safer to use a lighter dentine rather than a darker one, as this provides greater control in subsequent layering.
For this case, I incorporated high, intense internal incisal translucency using Aqua Blue 2 (a darker blue, in contrast to the lighter Aqua Blue 1) and E3 (a warm enamel) to avoid excessive translucency. This combination provides both depth and warmth while maintaining balance in value (Fig. 71), with the addition of Meister Liquid for consistency (Fig. 72).
The result after the first firing is shown in Fig. 73. Colour mapping is illustrated in Figs. 74–76, demonstrating the placement of A2 B dentine, Aqua Blue 2, and E3. These initial layers create the foundation upon which further refinements and details will be added in the subsequent build-ups.
1st Internal Stain:


The first internal stain aims to establish the necessary chroma (intensity of colour) and incisal effects. The materials selected are shown in Fig. 77, applied with Noritake Internal Stain (IS) Liquid (Fig. 78). The condition after firing is presented in Fig. 79.
It is essential to reproduce the incisal one-third effects at this stage, as stains enable far greater precision and control over fine details. For the body region, no additional colour was needed where the stump abutment was present. However, where dentine was built with ceramic, I applied Salmon Pink (Fig. 80) to introduce a subtle reddish tone.
For the incisal region, I used a thin layer of Cervical 2 (Fig. 81) selectively, avoiding areas directly above the stump, while enhancing the orange tone in the incisal one-third where ceramic had been layered. To reproduce the mamelon effect (Fig. 82), I created a custom mix: Bright (50%) + Mamelon Orange 1 (25%) + White (25%), combined with IS Liquid.
It is essential to use the Noritake IS Liquid, as it is specifically formulated for this purpose, enabling precise control and stability when applying intricate internal effects.
2nd Dentin/Enamel Build-up:


For the second build-up, the focus shifts towards refining the final shape while establishing the essential enamel layers. The materials used for this stage are shown in Fig. 83, applied with Noritake Meister Liquid as in the first build-up.
Since most of the internal effects were already established in the earlier stages, this firing concentrated on enhancing chroma and enamel structure. Additional cervical chroma was applied using CCV-4 (Fig. 85), while LT 1 and LT 0 were layered in the enamel regions (Figs. 86–87). These lustre shades are particularly effective for reproducing the subtle variations of natural enamel.
If an increase in value were required, ELT 1 or ELT 2 could also be incorporated. The choice depends on carefully assessing the colour guides, then testing and applying adjustments through experience. Over time, this trial-and-error process builds the empirical knowledge necessary to master ceramic layering.
For the incisal halo, I used A2 B dentine (Fig. 88), the same shade as the body. To introduce additional warmth, this could be mixed with Incisal Aureola. These refinements — mixing, blending, and adjusting colours — are where artistry meets empirical data. As ceramists, we should not shy away from experimentation; if a result doesn’t work, it can always be trimmed back or remade.
Shape Adjustment and Trimming:


At this stage, we have completed the first dentine/enamel build-up, followed by internal staining, and then covered with the second dentine/enamel build-up. For most cases, this sequence is sufficient, especially considering that further effects can always be added externally.
It is worth noting that my approach to porcelain build-up is almost always additive, rather than subtractive. In other words, I prefer to build the shape layer by layer rather than carving or trimming, leaving adjustments only for the very end. The one exception is smoothing the surface before internal staining.
For this particular case, however, I found that additional layering was required to achieve the desired effects. I therefore proceeded with one more internal stain, followed by further ceramic layering. The surface was first flattened and smoothed with a sintered diamond bur (Fig. 89), and then enhanced with intentional effects using a coarse spiral bur at high speed (Fig. 90), creating deeper grooves for texture.
Finally, I verified that there was sufficient ceramic reduction to allow for this additive layering. Both the labial (Fig. 91) and palatal (Fig. 92) views confirm that the space was adequate. If the form had already exceeded the target contour, further layering would have been unnecessary, as that would simply be a waste being trimmed away.
2nd Internal Staining:


For this stage, additional refinement was achieved through a second application of internal stains. The materials selected are shown in Fig. 93, used in combination with Noritake Internal Stain (IS) Liquid (Fig. 94).
After firing, the outcome is presented in Fig. 96. In some areas, the stain appeared slightly too intense, so I gently reduced the excess using a rubber wheel (Fig. 95). This allowed me to retain the desired effects within the grooves created earlier, while eliminating any oversaturation.
For the colour mapping, White (50%) + Bright (50%) was applied (Fig. 97). The grooves added previously held the stain effectively, ensuring the desired effect, while the excess could be trimmed away as needed. An additional mamelon effect was introduced into the incisal one-third using Bright (50%) + MO 1 (20%) + White (30%) (Fig. 98), adding subtle but essential detail for a lifelike outcome.
Final Layer to Cover the Internal Effects:


Fig. 99 shows the completed ceramic veneer after the final layering stage (prior to trimming). For this layer, I used the same ceramics as in the second build-up (Figs. 100–104), with the addition of a higher-value shade, ELT 1 (Fig. 101).
In this stage, I placed greater emphasis on horizontal colour application to introduce subtle variations in value across the surface, contrasting with the more vertical orientation of the previous layers. This layering, though thin, contributes to depth and natural vitality once the veneer is finished.
Some may argue that such a fine layer would make little difference and that a simpler approach would suffice. However, I have always believed in working without compromise — applying what I see as necessary to achieve the most natural result. Even when the effect is subtle, these refinements are what elevate the restoration beyond the ordinary.
Contouring of Restoration:
The final trimming and contouring phase marks the transition from layering to defining the restoration’s definitive form. Even though the veneer at this stage is already very close to the desired outcome, precise contouring remains essential to achieve the natural morphology, surface texture, and optical integration with the adjacent dentition.
From this point forward, the process involves a series of careful steps, each designed to refine both the shape and surface in preparation for the finishing stages. These include:

Step 1: Check the contact points carefully using articulating paper to ensure precision and harmony with the adjacent teeth (Fig. 105).
Step 2: Flatten and smooth the labial surface using a fine-grit diamond or rotary instrument to establish a uniform base for subsequent texture and detail (Fig. 106).

Step 3: Check the occlusion carefully and make necessary adjustments from the palatal aspect to ensure functional harmony (Fig. 107).
Step 4: Mark the line angles, using the adjacent natural tooth as a reference guide to achieve symmetry and balance (Fig. 108).

Step 5: Establish the marginal ridges by carefully trimming them from the marked line angles toward the contact points (Fig. 109).
Step 6: Smooth the labial surface with a rubber wheel to refine the contour and prepare for detailed texture application (Fig. 110).

Step 7: Finalise the palatal aspect and carefully define the margin using a rubber wheel for precision and smooth integration (Fig. 111).
Step 8: Mark the labial vertical grooves by referencing the adjacent matching tooth (Fig. 112). This step establishes the vertical lobes, which are essential for reproducing a natural and youthful morphology for this particular patient.

Step 9: Apply surface texture and refine the anatomy (Fig. 113). To guide this step, articulating paper was rubbed over the adjacent natural tooth to visualise its morphology, ensuring harmony and consistency in the final surface detail.
Step 10: Check the occlusion and anterior guidance (Fig. 114). This includes verifying protrusion and lateral excursion with articulating paper to ensure functional accuracy and long-term stability.

Step 11: Rub the surface with leftover ceramic powder or pumice (Fig. 115) to eliminate any oil residue before glazing. This step ensures the veneer is properly prepared for external staining and glazing.
Step 12: The restoration at this stage is completed and ready for glazing on the refractory die (Fig. 116).
Glazing and Polishing:

Once the restoration has been fully layered and contoured, the final characterisation is achieved through external staining. The stains selected for this case are shown in Fig. 117, and these must be used in combination with External Stain (ES) Liquid (Fig. 118).
Unlike the internal stains, which create strong and highly detailed effects within the ceramic body, external stains provide only subtle refinements. Their role is to adjust tone and enhance harmony with the adjacent dentition, without overpowering the underlying structure already established.

After glazing, the surface can be further refined depending on the desired final texture. A fine rubber wheel may be used selectively to adjust gloss or to control reflective patterns across the surface (Fig. 119).
For the final finish, polishing with pumice — such as Pearl Surface from Noritake — produces a lifelike lustre (Fig. 120). This subtle sheen closely mimics the natural surface characteristics of enamel, balancing smoothness with micro-texture for an authentic optical result.

The palatal surface requires an additional high-shine finish to minimise friction against the opposing dentition during occlusion and anterior guidance (Fig. 121). This step not only enhances function but also contributes to the long-term comfort of the patient.
The completed restoration is shown seated on the refractory die (Fig. 122). At this stage, the veneer is fully layered, contoured, glazed, and polished — ready for divesting and subsequent clinical try-in.
Divesting and Etching:

Once the veneer has been completed on the refractory die, the next step is divesting — carefully removing the restoration from the refractory material without causing damage.
To protect the ceramic surface, the veneer is first covered with lab putty (Fig. 123). This ensures that the glazed and polished surfaces remain intact throughout the process. The refractory die is then gently sandblasted with aluminium oxide (Al₂O₃) at a low pressure of a maximum pressure of 1–2 bar (Fig. 124). This controlled approach allows for clean separation of the veneer while preserving its delicate margins and fine surface texture.

After divesting, verify the fit of the veneer on the master single stone die (Fig. 125; see also Fig. 37). Once the marginal fit is confirmed, check proximal contacts on the solid model (Fig. 64) and verify occlusion.
When everything is satisfactory, etch the intaglio surface with ≤ 5% hydrofluoric acid for about 60–90 seconds (Fig. 126) for feldspathic porcelain. Unlike lithium disilicate, feldspathic porcelain is generally less sensitive to over-etching; however, you should still follow the ceramic/adhesive manufacturer’s IFU for concentration and time.
Clinical safety note: Use appropriate PPE and local isolation, apply HF only to the intaglio, and rinse thoroughly. Many protocols then ultrasonically clean and dry before silanation; follow your system’s IFU and local regulations for neutralisation and disposal.

Figs. 127 and 128 show the completed refractory veneer, both individually and seated on the solid model.
It has been a long, detailed journey through refractory die fabrication, porcelain layering, contouring, staining, glazing, polishing, and divesting — but this final outcome demonstrates the precision and artistry achievable with the refractory veneer technique. Each stage builds upon the last, requiring patience, technical accuracy, and an uncompromising eye for aesthetics.
We finally arrived at the result — a restoration that balances minimal invasiveness with unmatched colour control and natural vitality.
Try-in and Insertion:

Fig. 129 shows the restoration during try-in, and Fig. 130 demonstrates the veneer seated with a neutral try-in paste.
The use of a try-in paste is essential — particularly with thin refractory veneers — as it allows for accurate chairside evaluation of colour, value, and integration with the surrounding dentition. Without this step, subtle discrepancies could easily be overlooked, compromising the final outcome once bonded.
In this case, no colour adjustment was required. The veneer displayed the correct harmony with the adjacent teeth, confirming the restoration was ready for insertion.

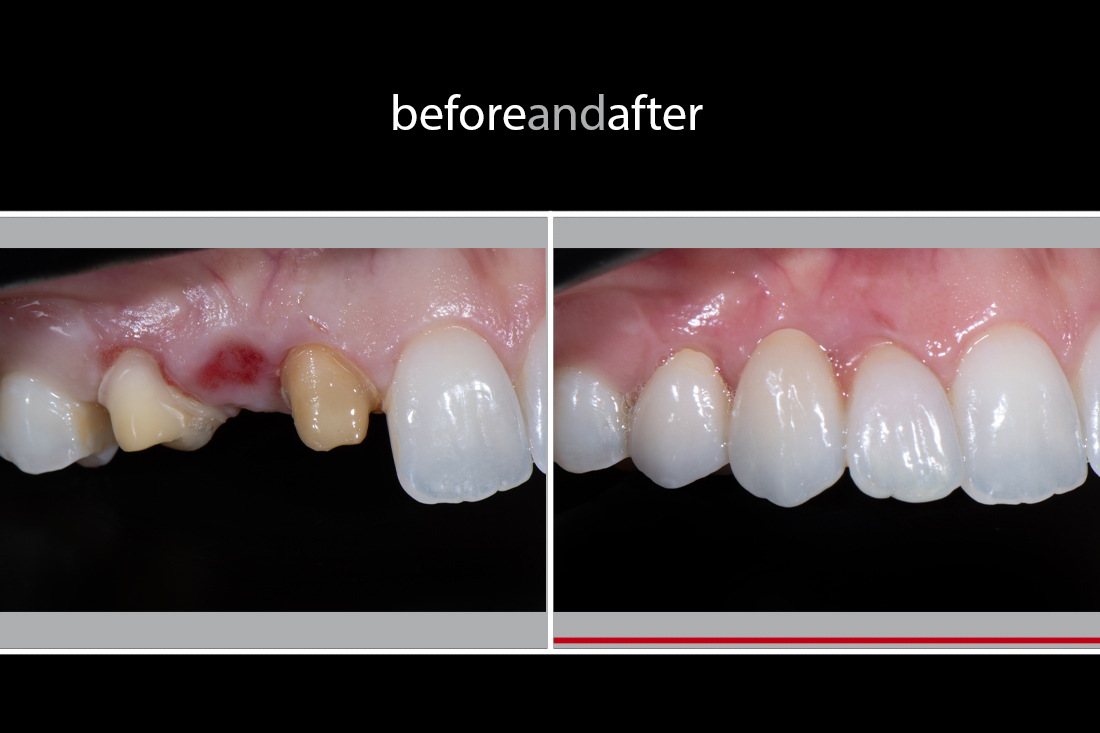
Fig. 131 shows the completed restoration immediately after bonding. The outcome was well received by both the patient and the treating clinician, confirming that the aesthetic and functional goals had been met.
At the two-week post-op review (Fig. 132), the veneer continued to integrate seamlessly with the natural dentition. The surface lustre, optical depth, and colour harmony remained stable, validating the precision of the refractory veneer workflow.
Our aim in this case was clear: to reproduce a restoration that is undetectable in the smile. This objective was fully achieved, demonstrating the enduring value of the refractory technique when aesthetics, conservation, and precision are paramount.

Figs. 133 and 134 show the post-operative condition, both at rest and in a close-up smile. These images mark the conclusion of the case journey, highlighting the seamless integration of the refractory veneer into the patient’s natural dentition.
I recognise that Case Study 3 was heavily technical and may appear complex to those less familiar with the refractory fabrication process. However, this detail is necessary to illustrate the precision and artistry demanded by the technique — and why it continues to hold a place in contemporary dentistry despite the prevalence of CAD/CAM-driven workflows.
To make this process more accessible, I have also prepared a video presentation, capturing the ceramic artistry in sequence. This visual guide demonstrates each stage of the workflow in motion, bringing the subtleties of refractory veneer fabrication to life.
Conclusion:
In an era where zirconia and lithium disilicate dominate as the materials of choice — celebrated for their strength, reliability, and compatibility with CAD/CAM workflows — it is tempting to regard refractory feldspathic veneers as an outdated, “old school” method. Yet, this journey has demonstrated that refractory veneers still hold an irreplaceable role in restorative dentistry.
The technique offers advantages that no digital system or pressed ceramic can truly replicate:
- Unmatched aesthetics and colour control through direct hand-layering.
- Ultra-thin restorations that preserve maximum natural tooth structure.
- The ability to adapt to complex or highly conservative cases where other materials would demand more aggressive preparation.
These strengths come with challenges — limited flexural strength, time-intensive model fabrication, and the need for an advanced technical skill set. But precisely because of these demands, refractory veneers elevate the practice of dental ceramics into a form of artistry as much as science.
For me, mastering this technique has been more than a professional skill; it has been a reminder that not every solution should be dictated by convenience, speed, or trends. Some cases demand the depth of craftsmanship that only handmade restorations can deliver.
I share this philosophy not only for colleagues who may encounter similar cases, but also for younger generations of ceramists. While the future will undoubtedly continue to advance with new digital materials and workflows, there remains enduring value in preserving these traditional techniques. To understand refractory veneers is to understand the foundations of ceramic artistry — a knowledge base that enriches every aspect of modern restorative work.
Ultimately, dentistry is not just about replacing or repairing teeth. It is about creating restorations that are undetectable, functional, and alive within the patient’s smile. Refractory veneers, when chosen with precision and executed with care, remain one of the most powerful tools to achieve that goal.