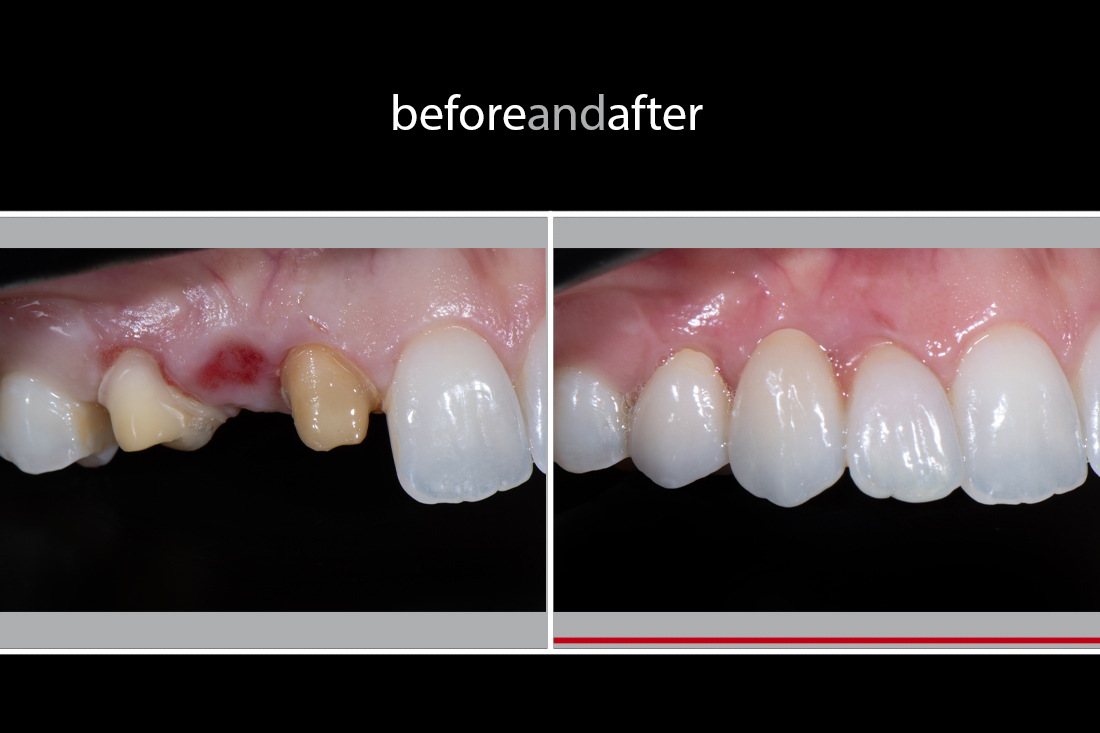
A male patient in his 30s presented with the aesthetic concerns on the gummy smile and prominent hypocalcification on the central incisors. Hypocalcification is a condition where your tooth’s enamel has an insufficient amount of calcium. When this happens, the enamel still covers the tooth’s surface but parts can be thin and weak, giving teeth an opaque or chalky appearance.
We decided to proceed with crown-lengthening, to begin with, and lithium disilicate (e.max) veneers on the central incisors for the better blend with the rest of natural dentition.


Figs 1, 3 and 5 show the pre-op condition. Figs 2, 4 and 6 show after completion of the crown-lengthening for the upper arch. See the consistency in the provided photos – retracted view, close-up smile and full-face smile – are essential for assessing the case in detail.
We can assess the hard-tissue information of natural dentition and the gingival level / marginal positions from the retracted views.
From the close up smile photo, we can determine:
- smile-line (i.e., high lip-line is usually known as a “gummy smile”
- lower lip relation to the incisal curve, which ideally should follow the curve of lower lip for more of a feminine smile
- the ideal length of central incisors and proportion
- the fullness of the arch – buccal corridor
Note: it is impossible to determine the mid-line from the close-up smile – only possible from the full-face photo.
From the full-face photo, we can determine:
- ideal mid-line/length of central incisors/proportion
- pitch/roll/yaw
- the fullness of the arch – buccal corridor
- suitable style/shape captured from the facial features

Figs 7 and 8 show ideal shade photos provided by the treating clinician. At the shade taking session, it is essential to consider:
- The clinician must have a good quality SLR camera with the right settings to pick and match the colour correctly.
- The clinician must take photos before treatment (prep) and after the completion of bleaching. Avoid dehydration at all costs during the photo session.
- The shade tab position and the tooth we are trying to match must be the same distance from the camera. Therefore, the edge-to-edge position would be best to pick the colour correctly. The shade tab shouldn’t be in front of the arch.
- Try to take photos with the shade tabs with different value/hue/chroma to provide extra information for the ceramist rather than placing a single shade tab.
- Ensure that the colour of the shade tab is visible in the photo. The clinicians shouldn’t count on their memories as to which colour they used during the photo session.
- For this case, the treating clinician selected the colour with Vita 3D-Master shade guide. However, the selection of the brand should be up to the ceramist. If the ceramists prefer and the ceramic bottles they use come in the Vita A-D shade guide, the clinician should be using that instead. The ceramist needs to match the colour, not the clinician, so the technical preference wins here.
I’ve presented more information about colour matching in the article featured in the Publication section titled ‘Reproducing Nature Part 3: Tooth Replacement with Root and Colour Matching using Digital Photos’ – so click here to read.

I cannot emphasise enough and how critical it is for the treating clinicians to provide the stump shade for all metal-free cases (Fig 9). You can use a Stump Shade Guide from Ivoclar, or any standard shade guides such as Vita A-D Classic so that the technician can reproduce the stump colour with light cure materials.
Note that you cannot mix the stump shade photos with the shade photos presented in Figs 7 & 8. Once prepped, the adjacent teeth get dehydrated, and thus it would make it impossible for the ceramist to colour match.

Figs 10-12 show the photos provided by the treating clinician with temps in situ. Again, there is a consistency in conjunction with the pre-op images taken from the same angles/perspectives. The clinician should then take an impression over the temps and provide it to the technician as a temp model.
Again, see the dehydration in the adjacent natural dentition – if you were to take the shade photo at this point, the outcome will be a total disaster.

Figs 13 & 14 show the post-op photos provided by the treating clinician. As a technician/ceramist, I would highly value working with clinicians who provide the after pictures as feedback. It really means a lot – gives me a sense of self-worth and motivation, as well as what/where to improve for future cases.
To recap what to provide for the technicians/ceramists, or what to expect from the clinicians:
- Pre-op full-face and close-up smile photos
- Pre-op retracted view (with cheek retractors)
- Shade photos indicating the final colour with the shade tabs against the matching teeth on the edge-to-edge position (must be taken at the beginning of the treatment or before the prep)
- Stump Shade (the colour of the abutments) with a shade guide within the photos
- Photos of temps in situ – full-face, close-up smile, and retracted view
- Post-op full-face, close up smile photos and retracted view as feedback
The more information the clinicians provide, the more accurate the outcome will become – the more the merrier – and we cannot have too much information. In this post, I presented the standard information the technician/ceramist should be receiving or working with, which considered as a benchmark. It’s just a matter of establishing a protocol with reasons – I will discuss further in an upcoming blog post presenting digital photography under the Clinical/Technical Tips and Tricks section – click here to read.
Acknowledgement:
I would like to thank Dr Glen Baker from Jacaranda Dental in Caringbah NSW, Australia, for his clinical excellence and all the photographs. https://jacarandadental.com.au
This case was issued in July 2011 with no remakes.
References:
Calcium Deposits and Your Teeth by Donna Christiano, updated on April 11, 2019. https://www.healthline.com/health/calcium-deposits-on-teeth