Reproducing Nature Part 3: Tooth Replacement with Root and Colour Matching Using Digital Photos

eLABORATE Magazine featured Yugo’s article titled ‘Reproducing Nature Part 3: Tooth replacement with root and colour matching using digital photos in 2006 (published language: English).
Introduction:
The technology available in dentistry in 2006 has improved significantly since I became a dental technician even though it’s been only eight years. Patients’ dental IQ and desires for beauty have also increased through exposure in the media.
Thanks to the advancement of software such as Adobe Photoshop, we can now give patients a new smile digitally/virtually before the commencement of work to provide them with a great idea of the final result with the projected outcome.
Material-wise, the trend has moved to metal-free restorations over traditional PFMs – higher aesthetics with less effort to achieve life-like restorations. CAD/CAM systems provide consistency and accuracy with a lot of potentials. It serves to achieve a higher standard (yet more uniformed) dental prosthetics on a larger scale without intensive technical training or experience.
A good quality Single-Lens Reflex (SLR) camera is a great communication tool that allows information to be sent digitally on-line, even internationally within seconds. If the ceramist could match the colour without ever seeing the patient (i.e., work from the digital photos sent via treating clinicians), it means the lab is suddenly open to a much broader client base.
When I look at the case I complete today (in 2006), I realise that every single individual case is somehow related to these technologies. I can now produce something that looks like a tooth in the mouth with the benefit of modern dentistry, and it has become an essential part of my reliable and credible team members.
Case Planning and Material Selection:


There are a couple of ways to reproduce a missing tooth. However, a single implant restoration is the only way to produce a tooth with a root attached to the bone.
The increased need for implants has become apparent, and Zirconia abutments using a CAD/CAM system have become the first choice for aesthetics with decent strength. Abutment selection is a root design. The position, angle, size, material, bone and gum condition are the essential aspects the clinician should discuss with the technician taking care of the rest of the designing.
In Figures 1-6, the patient has lost the 22 – left lateral incisor – in an accident. We have to consider the possibility that the pulp of 21 and 23 might become non-vital as they have many hairline fractures. Therefore the most conservative preparation would be necessary to preserver as much enamel as possible.
The rest of the teeth are all natural dentition. We decided to replace the 22 with a Zirconia Abutment and an Empress Crown (layering technique with Esthetic Veneer Porcelain, Ivoclar Vivadent) to seat over it, and Empress crowns on 21 and 23 as well. There are so many metal-fee systems around; however, it is essential to figure out which one is the most suitable material for individual cases to get the best result.
When I choose the material or advise the clinicians about the type of preparations for anterior restorations, I look at the following aspects:
- If the patient has bruxism or a clenching habit, Zirconia restorations would be suitable, and thus, conservative preparations are not recommended – i.e. laminate veneers or pressable ceramics are not applicable.
- Non-vital tooth of the stump shade (abutment colour) tends to become discoloured, and thus masking would be necessary without appropriate treatment by a clinician where necessary. There is a limitation with laminate or pressable ceramics for masking; however, the decision relies on the amount of reduction possible and actual shade of the stump. Zirconia seemingly has the most significant advantage of making discoloured teeth due to its higher level of opacity. The treating clinician should provide extra room for layering ceramics would be appreciated to have a variety of material choices. A crown-type of preparation would be more suitable over veneer-type of preparation with sub-gingival margin.
- If a metal core is underneath, then a Zirconia coping with a minimum of 0.8mm thickness in the coping would be necessary with an aggressive preparation to fully mask the colour of the darkness showing through from the stump.
- When cementing is required instead of bonding, choose a Zirconia crown.
- If the stump shade colour is close to the final shade with a reasonably conservative preparation, aesthetically, laminate or pressable ceramics are the wise choices.
- Regardless of the materials, eliminating all the sharp corners/edges on the preparation prevents fractures, and helps the restorations’ longevity.
Ideally, initial communication between the dentist and technician on each case should commence at the diagnostic wax-up stage. By doing so, we can eliminate a lot of guesswork, and we both know what we are trying to achieve and where we are heading.
Abutment Try-in and Ceramic Build-up:


Now let’s focus on the aesthetics at the initial try-in of the abutment (Fig 7). If we look at the abutment colour, you can see that the Zirconia abutment is much whiter/brighter than the adjacent teeth.
If we were to make a Zirconia restoration layered straight onto the abutment on 22, then there would be no need to customise the abutment colour at this point. However, when using Empress restorations with minimum room to work with, having a bright white colour underneath makes life difficult as it significantly affects the colour of the final restorations.
I try to match the colour of the abutment to the adjacent stump shade as much as I can so when I work on the Empress restorations, the properties of those three crowns would be similar. For this particular case, the final restorations would be relatively thin around the cervical half. The stump shade on 21 and 23 is very close to the colour I’m after in the end so I must consider incorporating the stump colour into the final restorations.
Colour Matching Using Digital Photos:


Shade taking off the patient has traditionally been how we have ascertained the correct colour from which to build the restoration. However, at this point in my career, I prefer selecting the colour from photos provided by the clinicians using a digital camera to have a broad client base. Additionally, patients save time, clinicians save some of their fees, and go and have a look at the colour anytime I want on the computer (even in the middle of the night). I can also spend as much time necessary examining the colour in depth without the presser of making the patients wait in the chair.
What I consider essential for colour matching off digital photographs are as follows:
- The clinician must have a good quality SLR camera with the right settings to pick and match the colour correctly.
- The clinician must take photos before treatment and after the completion of bleaching. Avoid dehydration at all costs during the photo session (Fig 13).
- The shade tab position and the tooth we are trying to match must be the same distance from the camera. Therefore, the edge-to-edge position would be the best to pick the colour correctly (Fig 14). The shade tab shouldn’t be in front of the arch.
- Monotone/Black & White coloured photos better define teeth’ surface anatomy and their value of the teeth than coloured photos (Fig 15).
- Highly contrasted image (Fig 16) better define the internal characteristics, translucency and structure.
- Increase the clarity/depth slightly more than what you see in the digital photos. The traditional photo slides tend to capture the translucency better than digital images.
- Consider the ‘Red-Shift’ as I explained in my previous article – click here.
- Try to see through the colour one layer at a time, starting with the most internal layer as that’s how I’m going to build the porcelain/ceramics. It is difficult to visualise something in three-dimensions (i.e., depth and colour) from two-dimensions (i.e., digital photographs), however; with a good quality of the camera, it is possible.
- Choose and understand all the colours (of the materials) you will use before building the porcelain/ceramics. I spend a lot of time thinking about exactly what colour to use where, and at which firing stage. I never commence the case in real life until I complete the whole process in my mind and visualising the final result. If you combine imagination, creativity, accuracy and consistency, then you will get a good result.
Completed Restorations:


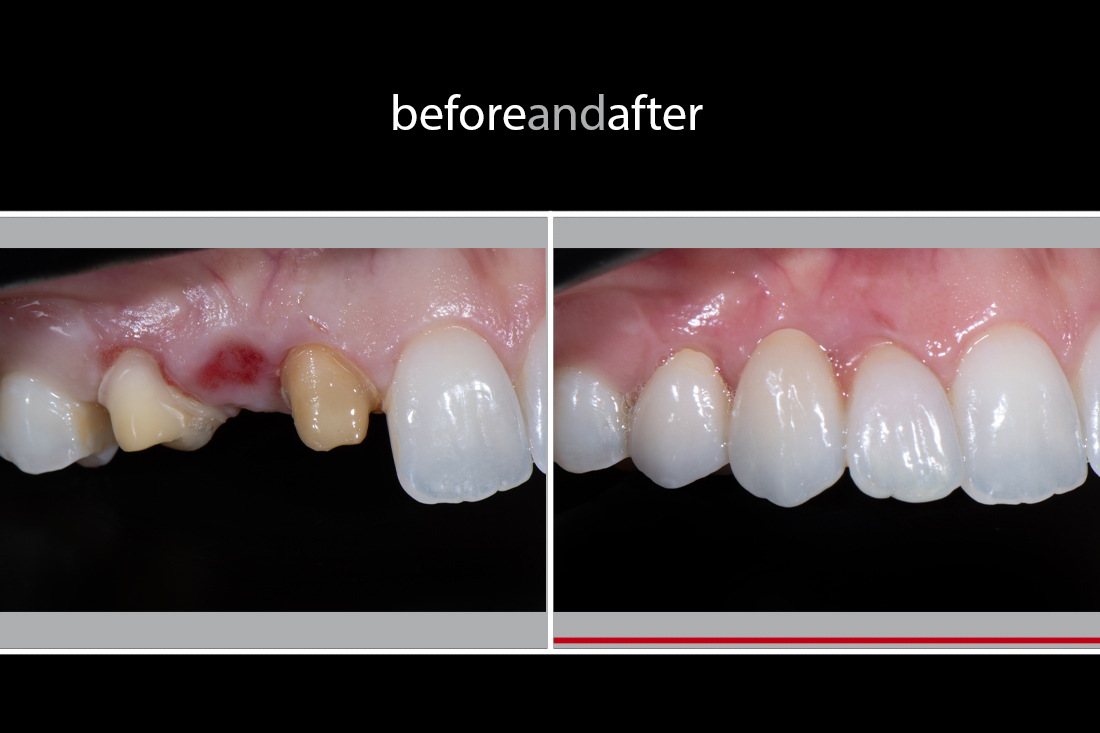
A critical factor in this case’s success was the incorporation fo the natural colour from beneath into the final restorations. In the mouth, the colour of the abutment came out exactly how I imagined (Fig 17) – the colour that I could see deep inside the 12 (the matching tooth), and some information picked from the adjacent teeth.
Figs 18-20 show the completed restorations in situ – 5 weeks after the cementation. Note that the gum is healing nicely on the implant site due to the use of biocompatible materials. This case is a typical example of making all the restorations in different shades but still achieving a natural aesthetics, blending with the surroundings.
Feedback from Dr Michael Mandikos:
“In working with Yugo, I have learned that it really is possible to give the ceramist a lot of information about the adjacent natural dentition, and then watch as they duplicate it for you. In this case, Yugo has demonstrated an ability to read colour from reference photographs, and tooth form and surface texture from the study models. His attention to detail gives me the confidence to advise my patients from the outset on what they can expect from their restorative treatment”.
Feedback from the Patient:

“ I was devastated to lose my front tooth and have another two badly broken in an accident. I wasn’t so sure about having surgery (an implant) to fix it, and never thought I would have my smile back again. I am really grateful to Yugo and Michael. They’ve done a fantastic job; I really can’t tell the difference between my own natural teeth and these new crowns!”
Acknowledgement:
I would like to thank Dr Michael Mandikos from Brisbane Prosthodontics, in Brisbane, QLD Australia for his clinical excellence, and the photographs.
References:
Postscript:
Looking back on this article, I realise that the digital implementation such as the use of CAM/CAM technology and digital photos gained popularity as a communication tool and an aid in the fabrication of dental prosthetics around this time.
It’s been 15 years since this article was published, but what I was saying back then is not too far away from what I do today – in fact, very similar, which shows the coherence with the way I approach my cases.
It is essential to obtain skills in digital photographs for both dental clinicians and technicians. I relied heavily on the clinicians’ skills to capture good images. Still, I shifted towards taking care of the matter into my hands for local customers from the Sydney region. I will present the protocol in taking good photographs in the upcoming blog post in the Clinical/Technical Tips and Tricks section (scheduled on April 2nd at 5pm (AEDT)).
Today, we can fully digitise some steps with the use of CAD/CAM technology. Also, colour matching devises/techniques such as eLAB system developed by Sascha Hein https://emulation.me and Matisse system designed by Marat Awdaljan https://www.matisse.ai. Topped with my patented invention – Aesthetic Articulator (I will link here with the upcoming blog post), I can achieve the accuracy with precision for all cases now.


Pingback: Reproducing Nature Part 4: Smile Design - Smile Virtuoso
Pingback: Before and After 2011: Setting a Benchmark in Digital Photography - Smile Virtuoso