
eLABORATE Magazine featured Yugo’s article titled ‘Reproducing Nature Part 2: Blending into natural dentition’ in May/June 2006 (published language: English).
Introduction:

Isn’t colour matching a restoration to nature one of the hardest things for all of us to achieve? To be able to reproduce the colour, there are so many factors we have to consider and get right. The value, chroma, hue, translucency, characterisation and even the surface anatomy and shine control of the tooth are all essential considerations.
However, from my perspective as a ceramist, we have to consider another crucial aspect – the background. The teeth in the mouth are always under the influence of the colour from the gum, and it is very easy for human eyes to make misjudgements in the shade taking.
I’m sure you’ve had an experience that the colour of the crown came out differently to your expectations when in situ even though you thought you had matched the colour reasonably well before bonding/cementing. Why? What is it exactly? How does the gum affect the colour of the teeth?
Figure 1 and 3 are identical. There are some leftovers from lunch (salad maybe?) between 42 and 43 but not to worry. If I were to cut one of the teeth out (Figure 2) and move it to Figure 3, what do you see? Figure 2 shows the tooth contains more of a ‘reddish’ colour than the teeth in Figure 3. Remember, these two photos are identical in every aspect. Isn’t there a significant difference?
It shows that the amount of the additional reddish colour you see in Figure 2 is the amount of reddish colour you lose on restorations in the mouth. It means that without making the colour of Figure 2, you wouldn’t be able to reproduce the colour of the teeth you see in the arch. So when we make crowns, what do we make? Yes, we make Figure 2 as we do not have the gum as a background while working on restorations. Fundamentally we have to consider adding this ‘reddish’ colour into our restorations to match the colour properly.
In this article, I have an excellent opportunity to introduce Lava Ceram from 3M ESPE and share my way of reproducing the colour using the new ceramic.
Preparation:

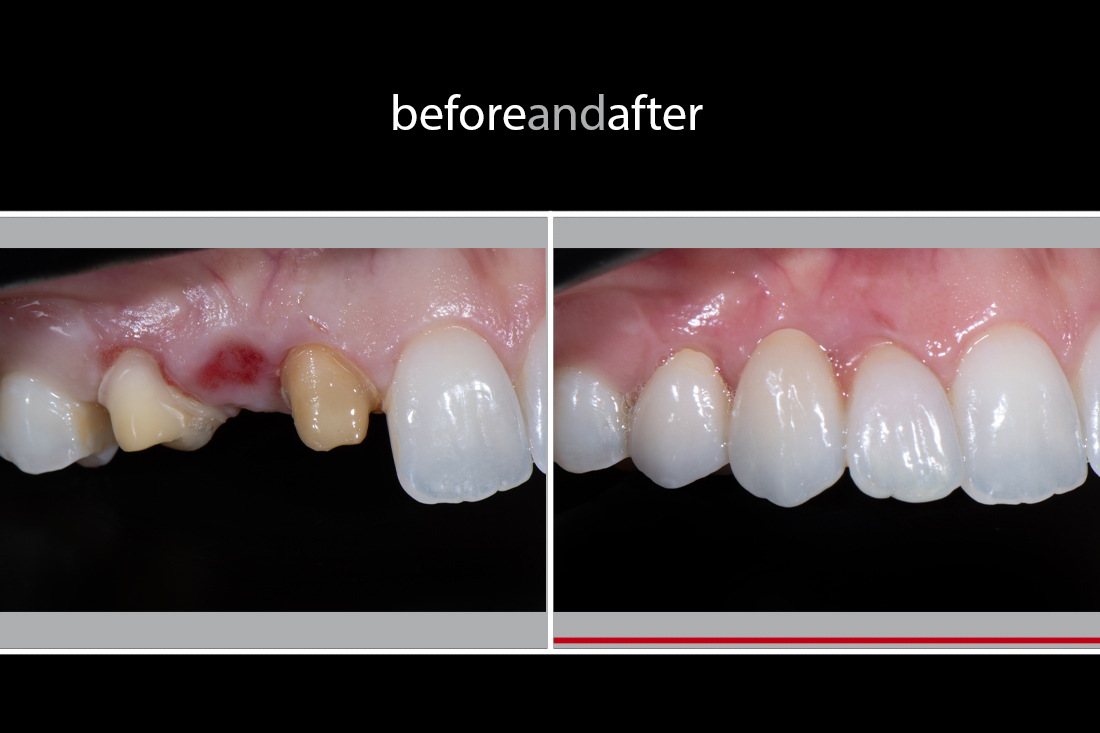
In this case, the patient’s primary concern is the aesthetics of 22 (Figure 4). The other teeth are all natural dentition with some amalgam restorations in the posterior region. The patient is happy with the shape of the existing restoration completed in the UK, but the colour is not quite blending into her natural dentition. You can also see some grey area around the gum because of the Porcelain Fused to Metal (PFM) restoration, which doesn’t meet the patient’s expectations.
Taking a stump shade is a must at the prepping stage (Figure 5). You can use a Stump Shade Guide (Ivoclar Vivadent, Australia) or if you find the colour of the stump shade guide is limiting, then you can also use Vita A-D Classic Shade Guide (Henry Schein, Australia) to reproduce the stump colour with light cure materials (e.g., Empress Die Material from Ivoclar Vivadent or Solidex from Shofu) (Figure 6).

I require stump shade for all the metal-free restorations, including any Zirconia system. Metal is the only material the light doesn’t go through regardless of the thickness, so I don’t require a stump shade for PFM restorations if the margin is sub-gingival. The translucency of the Lava Zirconia coping is very close to dentine’s, so it’s not that opaque. Therefore the colour of the stump could affect the colour of the final product.
Lava copings come in 8 shades. I find this is one of the most significant advantages of selecting the Lava Zirconia system: you don’t get the refrigerator door coloured copings anymore (Figure 7).
I always consider the stump shade when choosing the colour of the copings. When masking is needed, I tend to select the colour of the coping that is low in chroma and high in value. The coping’s brightness is more critical than the opacity for masking a dark coloured stump including metal cores with any metal-free restorations.
For this particular case, the stump shade is St7, which is quite dark, so I decided to use the coping FS1 (suitable for A1 or B1 shade) instead of FS2 (suitable for C1 or B2 shade) to reduce the chroma of the coping for slight masking.
Shade Taking:


With single restorations, our aim should be to achieve a result that blends in with the surroundings. I think it’s unnecessary to match the colour to the opposite or adjacent teeth 100% as each tooth has individual characterisation. For this particular case, every tooth has a different shade and characterisation but nothing stands out apart from the 22.
For this case, I was fortunate enough to take the shade myself, but I usually don’t have this luxury. The way I take the shade with patients is the same as how I pick the colour off of photos. I try to see through one layer at a time as I explained in Part 1 (the previous) of the article. Making your personalised shade guide would be an excellent idea for additional information (Figure 9). I take the shade with the Vita Classic shade guide to get the base colour (Figure 8), then I try to get the details with the Lava Ceram customised shade guides (Figures 10 and 11).
Coping Try-in:
Now I’d like to show my way of customising Lava Zirconia copings. I believe that this is the most critical stage of veneering porcelain to reproduce natural-looking aesthetics. I put extra effort into replicating the required aesthetics around the cervical as much as the incisal 1/3. Around the cervical area would be the first part I’d look at if I had to pick which tooth is natural and which one is a restoration.
I’m aiming at the wash firing process to make the colour of the coping reasonably close to the final shade. If you get the colouring correct at this stage, the colour you’d achieve in the end should be very close to the desired outcome. The beauty of the technique is that even when you have little room to work on, you can still get the colour correct on an acceptable scale, and also the colour of the core tends to become invisible in the final restoration.

Figure 12 shows the coping in sith with one layer of MO (Framework Modifier) C1 recommended by the textbook. I’m not confident enough to go ahead with this coping to blend it into the natural dentition: the value appears too high.
Figure 13 shows the coping that I’m satisfied with. I think it blends into the natural dentition already! As you can see, this coping makes my life a lot easier with the veneering porcelain from here on. I keep in my mind with Lava Ceram that the dentin porcelain is just a little bit low in value, so ensure not dropping the value too much at the wash firing stage. Hence, the value of the coping in Figure 13 is slightly high compare to the adjacent teeth, but it’s perfect for the moment.
For this customised coping, I focus on adding a bit of chroma and increasing the translucency down to the margin, plus adding reddish colour as I showed earlier in this article. Most of the chroma should already be there thanks to the colour variation of the Lava copings. However, I’ve chosen a coping one shade lighter for this case than it should be for the slight masking effect, so I use translucent material that contains some additional chroma to reproduce the colour.
Post-op – finished product in situ:

I think the result here is satisfying. I’ll give myself an 8 out of 10 for this case. Avoiding the black triangle was one of the hardest parts on this tooth, but it came out well. I should have used white dentin as a base for better control of the colour during the build-up, but the patient was ecstatic with the outcome, so we have decided to cement the case instead of remaking it. Believe it or not, the restoration looks better in real life, so we didn’t realise it until we saw the photos!
The vital point is meeting the patient’s expectations, and I get much job satisfaction when I see a patient’s smile with my restorations in the mouth. Remember, our job is making people smile.
As an acknowledgement, I’d like to thank Matt Race for being the photographer and Dr Brad Moore for his clinical excellence. Great teamwork guys!
Feedback from Dr Brad Moore:
This case was relatively straightforward from a biological perspective. Soft tissues were healthy, the tooth vital with little parafunction. Aesthetically, however, we were facing a high smile line and a patient who wanted a perfect result.
From a clinical perspective, the result was fantastic. In this case, a resin-based light-cured cement was used as a glass-based cement would affect the final shade.
Zirconia, in my opinion, is the closest material we have to a PFM replacement. Traditional prep and cementation techniques can still be maintained, and its toughness will meet most occlusal demands. Coupled this with Zirconia’s considerable aesthetic advantage and you have a great combination.
I have been using Lava since July 2005, and have found it to be an extremely predictable restorative system from both a functional and aesthetic perspectives. Coupled with Yugo’s uncanny ability with layering porcelains, the material has really changed my outlook on all-porcelain restorations.
Feedback from the patient – Carol Tate:

References:
Postscript:
It is hard to believe that it’s been 15 years since this article was published. I must admit, though, the concept and general philosophy that I apply on day-to-day cases are almost identical to what I produce to-date.
I presented the application of porcelain margin in the original article, which has been omitted from this article as that’s not what I do now and don’t find the necessity in the quality/translucency of Zirconia in 2021. I also excluded the build-up images from this blog post due to its quality that no longer meets my standards.
It is reminiscent of looking back on what I produced in the past, which I can still be proud of. The material – Zirconia – was brand new and innovative at that time, but it has now become the norm as a replacement of PFM, and thus, it was worth the investment back in those days to try and explore the new techniques. I wasn’t afraid of testing something new on actual cases and developing the necessary clinical and technical evidence that can still be applied today. My journey will be continued!


Pingback: Reproducing Nature Part 4: Smile Design - Smile Virtuoso
Pingback: eLaborate Nov/Dec 2006 - Smile Virtuoso