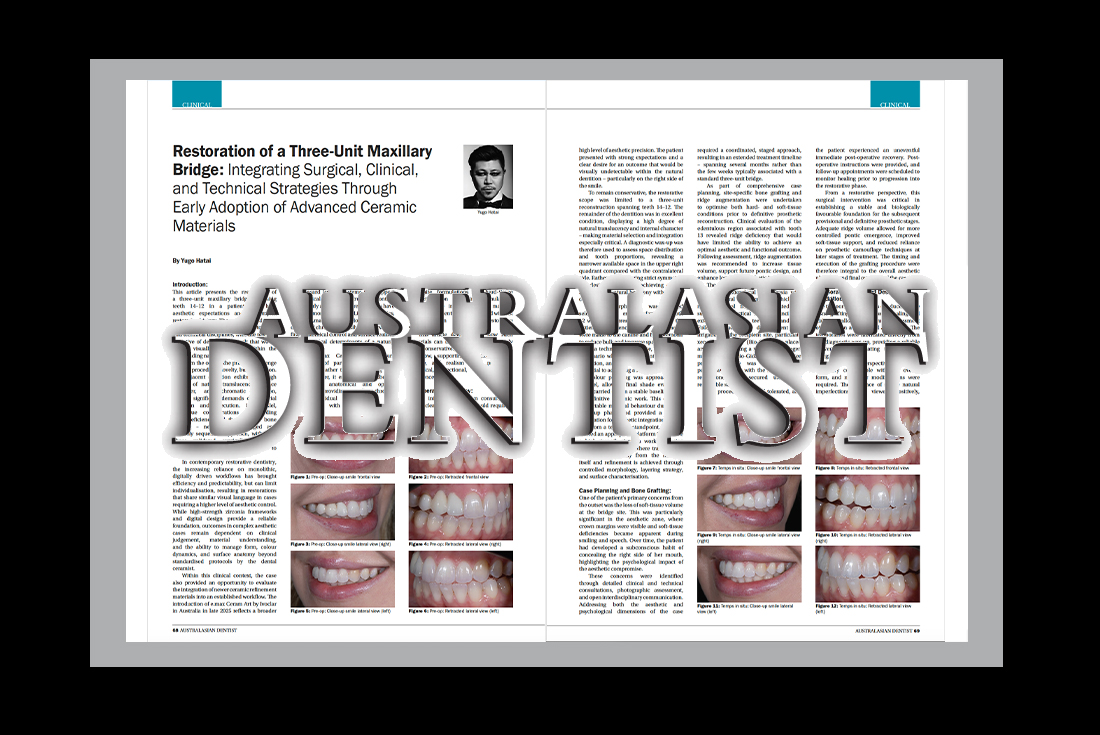
Reproducing Nature Part 1: Understanding the Composition of Natural Dentition

Eminent peer-reviewed publication – European Journal of Esthetic Dentistry – featured Yugo’s inaugural international article titled ‘Reproducing Nature: Understanding the Composition of Natural Dentition’ in 2008 (published language: English, German, French, Spanish, Italian and Greek).
Abstract:
Ceramists may be able to produce excellent results, but none can improve on the natural dentition. Natural teeth are always the benchmark to which every ceramist should aspire.
Becoming a better ceramist requires training and application, and one of the best ways of training is to copy natural dentition. The amount of information that can be gained just by examining natural teeth is enormous. Natural dentition is irregular, but it is also in proportion and perfectly balanced. By trying to reproduce natural teeth, the ceramist will appreciate their diversity, and will never stop learning from the experience. This article presents one way of training to better understanding the shape, colour and materials of teeth.
(Eur J Esthet Dent 2008;3:372-380.)

Step 1: Preparation:
Figure 1 shows a natural tooth 24 (maxillary left first premolar). For training, a good exercise is to make a tooth for the opposite side – in this case, tooth 14, the maxillary right first premolar. It is typical of what a ceramist would be given to match for shade and shape in an actual case. Also, this will provide the ceramist with the opportunity for some creativity. It is not necessary to try to copy the natural tooth exactly; rather, the shape and colour of the restoration should be such that it will blend into the natural dentition. In nature, teeth never have Precisely the same colour or shape. A restoration can look slightly different from the matching natural dentition. However, it will still look natural if the value, chroma and hue are correct, and a suitable shape is chosen.
Working with a natural tooth is not easy – as the tooth dries out, the colour changes, so it is essential to keep it wet always. It is recommended that the tooth is duplicated (Fig 2) before the build-up. Then the duplicate is used as the guide for the shape of the restoration as it defines the tooth morphology better.
Step 2: Shade Taking:

The first stage is to assess the base shade, for example, by using the Vitapan Classical A-D shade guide (VITA, Zahnfabrik, Germany)(Fig 3). It gives a good comparison of value, chroma and hue to the basic shade. At this stage, it is not necessary to focus on the detail. In this example, shape B2 is the closest.
Next, move onto the details of the tooth colouration using individual shade tabs (Nobel Rondo, Nobel Biocare, Göteborg, Sweden)(Fig 4). It is helpful to focus on one layer at a time and to assess the colours of the core, dentin, and enamel, and any transparency and hypo-calcifications. It is vital to work from the internal layer to the external layer, as that is how the porcelain will be layered.
It is also essential to check the shade of the restoration after each firing stage (i.e., between the first dentin firing and second firing) to make sure that the colour of the final restoration will be as intended. The appearance after firing might be different from the expectations: as it depends on the shape and the thickness of the porcelain. The firing temperature or program could also affect the colour.
Step 3: The build-up:

For this type of exercise, it is helpful to start from the root and to use dentine porcelain as a base. There are two roots for premolars: the roots can be made individually (Fig 5) and then joined together on the next firing (Fig 6).

They are then covered with enamel for depth (Fig 7). After firing, the roots are trimmed, as in a conventional restoration preparation (Fig 8). It concludes the preparation for veneering porcelain, and now ready for the layering of the crown.

The aim at the first dentin firing is to create the internal dentin shape and colour and to add some depth using enamel/transparent material around the incisal area. For the tooth in this example, the value of the dentin should be slightly higher than B2: some colour will be added in the enamel /transparent porcelain, which will bring the overall value down as built up, and thus, dentin B1 is selected to maintain the high value. For the depth, bluish opal enamel is applied around the incisal area. For the occlusal surface, coloured transparent material is used, with extra chroma added by using stain or something intense to produce the colour of the pulp (Fig 9). There is no rule as to what to use: feel free to use whatever will achieve the colour but pay attention to its opacity at the same time. Fig 10 shows the ceramic tooth after firing.

On the second firing, coloured translucent porcelain for the chroma and depth should be used and covered it with enamel porcelain for the final shape, but try not to overbuild. It is not necessary to trim between firings, but at every firing, it should be ensured that the form at the build-up stage is very close to the final shape. The amount of shrinkage on each firing determines the amount of porcelain to be built up for the next firing. Trimming needs to be carried out when the build-up is finalised to preserve what’s been built. By adding material instead of trimming for shape and colour, no colour is lost, and a more natural form is achieved (Fig 11). Fig 12 shows the ceramic tooth after firing.

The Third firing is mainly for shape adjustment and value control. In the example, the colour is heading the right direction, but the value is slightly low. Whitish opal enamel is mixed into the enamel to increase the value. For the occlusal surface, coloured transparent porcelain is again used (Fig 13). Fig 14 shows the ceramic tooth after firing.


The next stage is to add some hypo-calcifications. Hypocalcifications appear quite opaque, so the most intense white-coloured porcelain (most likely stain) is mixed with the whitest porcelain available within the ceramic kit. Stain by itself would come out too opaque, so it is essential to add some translucency to dilute the opacity. Using stain liquid instead of a build-up liquid allows the colour being applied to be visualised easily, plus it is easier to work with when adding precise details (Fig 15). Slight adjustments to colour in any areas can be made at this stage using a thin layer of stain. It is essential to put most colours internally to achieve the depth of colour. Fig 16 shows the ceramic tooth after firing.

The last firing is mainly for adjusting the shape by using a thin layer of transparent material (Fig 17). Coloured porcelain or pearly looking porcelain can also be used to apply more detail if needed. Again, there is no rule as to what to use. This type of training exercise is intended to give the ceramist empirical achievement, so it is a good idea to use as many colours as possible with the porcelain you use in practice to find out how to achieve the desired colour you are after. Touching up the root with transparent material will also be necessary, as it will have shrunk during the previous firings. Fig 18 shows the ceramic tooth after firing.

Minimal adjustment is required using the build-up technique shown above. Surface anatomy affects light reflections and so as changes the colour, thus it is crutial to match the natural tooth surface (Fig 19). After glazing, polishing the wear facet is essential as this tends to have a shinier appearance than the other parts of the tooth (Fig 20). Additionally, reducing the glaze on the root area is necessary because it doesn’t appear shiny in real-life. Finally, add some detail onto the root to complete the restoration.
Finished Restoration:

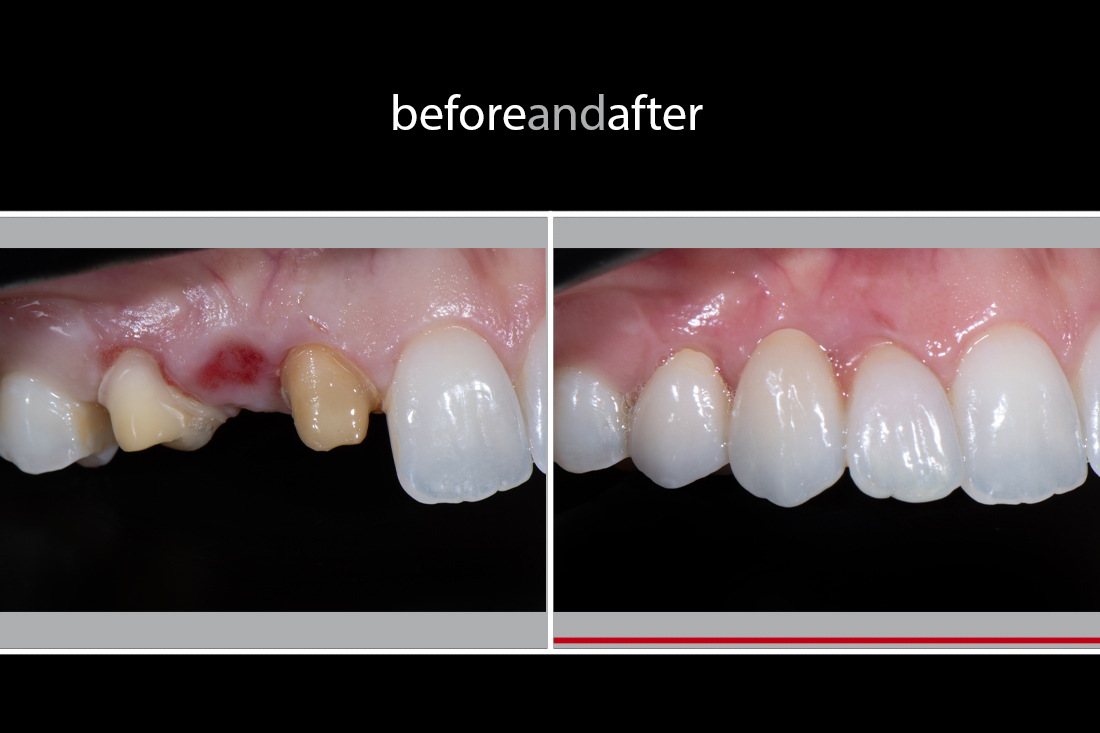
The image above shows the completed ceramic tooth, which demonstrates the satisfactory result (the one on the left is the natural dentition shown in Fig 1, whereas the one on the right is the mimicked ceramic tooth). The natural tooth had dried out a little during the photography session, so it is slightly whiter than it should be. Still it is acceptable for the comparison, and the result is satisfactory.
Conclusion:
The most important aspect of training is what is learned and observed during the process, and most importantly, cherishing the whole experience. When it is enjoyable, the result tends to be much better due to the positive, conscious mind-set that provides self-motivation. The training exercise described above is recommended to all ceramists who aspire to be the best you can be!
Postscript:
This article was originally published locally in eLABORATE magazine in Nov/Dec 2005, and then later revised the contents to suit the academic journal.
It is not an understatement that this article has given me the direction as to where I would like to be, and what to achieve in dentistry. That is, I wanted to become an internationally recognised figure – i.e., to be ‘someone’, and contributed to the continuing education in dentistry by presenting what I could offer with my skills and knowledge.
It was such an honour to be accepted in this highly recognised peer-reviewed journal in the realm of aesthetic dentistry at the beginning of my career. It certainly has given me a great sense of achievement, satisfaction and motivation at the same time.
Presenting my work in a peer-reviewed journal was not easy because it meant that my work was critically judged on an international scale in several languages. A high level of presentational skills was also required – such as organising the structure, the careful application in the quality of the images, and good writing skill. These elements are something I’m still working on today, and the quest to improve in all aspects never end.
I’m looking forward to witnessing and experiencing how far I can go with my personal growth from here on!


Pingback: Reproducing Nature Part 4: Smile Design - Smile Virtuoso
Pingback: eLABORATE MAY/JUNE 2006 - Smile Virtuoso
Pingback: eLaborate Nov/Dec 2006 - Smile Virtuoso