
LVI Visions featured Yugo’s article titled ‘Reproducing Nature: Smile Design in 2008 (published language: English).
Introduction:
Today, creating a natural-looking smile is essential in cosmetic/aesthetic dentistry. As I mentioned in the first part of this article (European Journal of Eesthetic Dentistry Winter 2008), many people think that white “Hollywood Smiles” look fake but is it true? Have you thought about bleached natural dentition? I think it looks healthy and attractive but doesn’t look fake at all. That is the type of benchmark I set for myself when the patient is after a perfect smile – i.e., bright yet natural.
Now, what is the definition of “perfect” anyway? Does it mean that it’s perfectly in proportion, perfectly adapted to the patient’s desire or could it be perfectly looking and ridiculously artificial? It is a merely subjective matter. In my opinion, “Nature = Perfect” means it is essential to continuously include nature’s principles to avoid making the restorations look artificial while trying to meet patients’ expectations.

Fig 1 shows a completed case – a 10-unit Smile Makeover (15-25), for an American dentist and patient from New York wanting a bleach shade of BL4 (Ivoclar Vivadent) as a base. We somewhat have stereotypes in mind that Americans want fake-looking super bright white teeth, but most American people don’t mind looking “perfectly” natural.
Most of us desire a natural-looking attractive smile regardless of where you live. Of course, there are some exceptions, but it may come down to educating the patient. I find many patients who want some cosmetic dental work don’t want people to find out that they’ve had their teeth done. Therefore, we should aim for something that blends into the patient’s character, facial features, and profiles. We should always include their desires and concerns into the planning and the aesthetic outcome.
Another important thing is that every case should look different to fit the individual patient, and if someone can pick who the ceramist is, I have failed. A dentist or ceramist with a certain-style in shape and colour, and ignore the individual values don’t follow nature with their egos. Though there is a basic rule to follow, nature doesn’t have a consistent shape or colour style. As long as it looks like teeth in the mouth, not artificial-looking restorations, and meets the patient’s expectations, then it is a success.
Creating a beautiful smile is not an easy thing to do. Especially with larger cases – from 6 anterior teeth to a full arch, through to full mouth reconstructions – there is so much room for creativity. It is easy to fall into a trap, which would make the restorations look unhealthy and artificial instead of natural and “arty”. I follow a couple of principles to achieve attractive, natural-looking smiles, and here are the steps I go through for “Smile Design.
Case Planning and Diagnostic Wax-up:

“A case from hell” would be the best way to describe Fig 2, which aesthetically shows the problem. Ideally, the patient should initially commence orthodontic treatment to move the teeth into their optimal positions over time; however, we often work with patients who are unwilling to wait or accept the lengthy treatment plan.
In Part 3 of this article (eLABORATE Nov/Dec 2006 – click here to read), I presented a tooth replacement case with an implant. For this patient, we decided to go ahead with another option – “Bridge” – as I believe this would be the best option for this case. As can be seen, the lateralised canines are almost in the middle in between the centrals and first premolars. It means that I had to change the proportion and the position of the teeth significantly.
I had hoped that the separation of the bridges wouldn’t be on the lateralised canines’ abutment, but unfortunately, I found out later that this would be the case. As a result, the difficulty of the issue increased.
There is a limitation with what the clinician and technician can achieve on this type of case, and it could be called “a compromised case” for this reason. It, however, doesn’t preclude trying our best.


The patient is a 44-year-old female hairdresser from the UK, with concerns for her upper teeth (Fig 3). In her words, she “desperately wants an attractive smile”, however, had found selecting an enthusiastic dentist that could deliver the desired result difficult.
When approaching highly aesthetic cases such as this, I typically commence the case with diagnostic wax-up to avoid guesswork. Once you start guessing, problems that could be corrected easily early on start to compound.
Ideally, when proceeding with the diagnostic wax-up, the minimum information and instructions the clinician should provide are:
- indication of the number of units and position of the teeth
- patient’s profile
- at least two photos – a full face photo (Fig 3) and a close-up smile photo (Fig 4)
- Style/Shape the patients prefer. They can bring a image or a clip from a magazine that they desire. We can also show them a style book (The Smile Catalogue from Dr Bill Dickerson – Fig 7) or some example of natural dentitions (examples of natural dentitions using CALLAplus models, TeamZiereis – Fig 8). To my surprise, many patients can be very particular about the shape /style they desire, and thus, it is essential to specify what we are trying to achieve in the end.
- Most importantly, the patient’s primary concern. Ultimately we are trying to make the patients happy, so we always have to take their concerns and desires into account and improve the specific area. Otherwise, they would not be satisfied with the outcome no matter how good the result appears in the professional eyes.
Having soft-tissue information, such as facial features and lips, is essential. From the full-face photo, we can determine:
- ideal mid-line/length of central incisors/proportion
- pitch/roll/yaw
- the fullness of the arch – buccal corridor
- suitable style/shape captured from the facial features
From the close up smile photo, we can determine:
- smile-line (i.e., high smile line is usually known as a “gummy smile”
- lower lip relation to the incisal curve, which ideally should follow the curve of lower lip for more of a feminine smile
- the ideal length of central incisors and proportion
- the fullness of the arch – buccal corridor
Note: it is impossible to determine the mid-line from the close-up smile – only possible from the full-face photo.
The smile photos capturing the pre-op lateral views (Fig 5 & 6) are both optional, but I find them essential as we can determine:
- ideal incisal edge position
- over-bite and over-jet relationship
- the ideal length of the central incisors
As I mentioned earlier, this is just the minimum amount of information you should receive from the clinician, and of course, the more the merrier. Constant communication among the team – the clinicians, technicians/ceramist and patient – is essential, and don’t be afraid to ask for more information when in doubt. The more information we have, the more accurate the outcome.

Fig 9 shows the pre-op upper and lower models. We decided to use Empress veneers (Ivoclar Vivadent) on 16-14 to bring the buccal corridor out. A Lava Zirconia bridge on 13-11 and 22-24, with a single Zirconia crown on 21 (3M ESPE), which totals ten units in all. It is essential to incorporate natural aesthetics into the shape/style of diagnostic wax-up, as discussed above. I find getting some hints from the matching CALLAplus models from TeamZiereis (Fig 10) with Fig 8 while waxing-up helps eliminate artificial influence.


It is essential to make the wax-up as close to what we are trying to achieve as possible. Here are some principles I include from nature to help achieve the desired outcome:
- Proportions of the six anterior teeth – aim for the golden proportion. The number indicates the ratio (Fig 11 (A));
- Tooth proportion – ideally, around 75-80% (length to width, square is 100%) (Fig 11 (B));
- Graduation of posterior teeth (Fig 11 (C));
- Axial incline – long axis from cervical should cant to distal (Fig 12 (D));
- Zenith – for the central and canine, the position of the zenith should be towards distal and for the lateral, it should be in the middle (Fig 12 (E));
- Gingival level – the lateral should be shorter by around 1.2-1.5mm (Fig 13 (F));
- Incisal embrasure – should increase towards distal up to the mesial of the first premolar concerning the contact points (Fig 13 (G);
- Contact points – should get closer to interdental papilla towards distal, up to the mesial of first premolar (Fig 13 (H)); and
- Morphology – always try to get some idea from the pre-op model if there is any natural dentition left, otherwise follow my statement above using some natural dentition models (e.g., Fig 10) to get some inspiration.
Note that I’ve inclined the 12 inward, but I don’t recommend doing this to make them look natural. It is a high risk, challenging to attempt, and many patients wouldn’t want this. For this particular case, I have done this for a couple of reasons with the clinician’s and the patient’s permission. Even so, I have kept it in proportion, so it will not appear noticeable in the mouth, especially in the patient’s view.
If you want to try something different, then I always recommend doing so on the laterals. Quite often, there is a lack of symmetry in laterals in natural dentition, and the slight difference in shape can look natural as a whole. It is just a matter of getting the balance correct – i.e., irregular but in proportion.

The beauty of having the diagnostic wax-up before the porcelain build-up is that the patient can visualise the ideal final result with the temps made from the wax-up. We can make any changes to the shape of the temps as necessary if required. Essentially, we use the diagnostic wax-up to eliminate the amount of adjustment that could occur in the mouth.
Upon completing diagnostic wax-up, technicians (or even clinician if equipped) can fabricate a soft wash putty key off the wax-up (Fig 14), so that clinicians can quickly produce temps with self-cure material in the mouth. Fig 15 shows the completed temps in situ.
In this case, the treating clinician had to take the photo on the same day because of the patient’s flight schedule. However, the clinician should provide the temp photos at least 48 hours after the prep session and placement of the temps. The anaesthesia can affect the soft-tissue information negatively and makes it inaccurate to assess. The patient was pleased with the appearance of the temps with minimum adjustments.
It is also essential for clinicians to take an impression of the temps with alginate after any adjustment or touching-up so that the technicians can visualise the current condition of the temps in situ. Even if the clinician doesn’t make any adjustments after producing the temps from the soft wash putty key, I sill require the impression of the temps or temp model when poured at the practice. There is no guarantee that the wax-up and temps in situ would be the same; technicians can only “guess” that clinicians fitted the soft wash putty key in just the right position but how do you know?


Additionally, providing a prep guide would make the clinician’s life easier when prepping. Figs 16 & 17 show the prep guides we usually provide – assessing the sufficient reduction from labial and incisal.
Fig 18 shows the ideal prep design I produced. I know exactly how I want the clinicians to prep to achieve the projected outcome, so I prepped the model using the prep guides shown in Figs 16 & 17 so that the treating clinician can visualise the ideal preparation in 3-dimensions (Fig 18). Fig 19 shows the result with my prep guide against the final impression from the clinician. See how close they are – it demonstrates the excellence in treating clinician’s skills in the challenging situation.
The Coping Design:

It is challenging for ceramists to achieve individual looking bridges. I consider the position of the connectors the most critical. If you get this wrong, regardless of what you subsequently do, it will look like a bridge rather than individual looking teeth.
It is relatively easy to place the connector in a correct position. Please go back to Fig 13 (H). You can see the contact points, and with bridges, the contact points = the connector’s position. Thus, all we need to do is follow the principles – i.e., the contact points’ position gets closer towards gingival as moving distally.
Another element we should consider is to place the connector slightly towards palatal for a couple of reasons:
- I get more room to play with during the ceramic build-up labially, helping the separation between the teeth.
- The palatal region is not an aesthetic zone, so it is better to put greater strength in this area. Most of the time, the patients would prefer smooth anatomy at the back of the teeth (rather than full anatomy). Thus I create a pleasant and smooth area with Zirconia and polish it after glazing without layering porcelain – a combined approach with aesthetic and function.
Remember to check the bite/occlusion before you place the connector or add additional support/thickness. The last thing we want is to have the connector in occlusion a heavy bite.
Lastly, in concerning the contact points’ position, I focus on the incisal embrasure, which is followed by the principle detailed at the diagnostic wax-up stage (Fig 13 (G)). The ceramist must always get involved in the design of the copings. Do not leave the coping designs to whoever does the waxing or scanning. The build-up starts from here, so if something goes wrong, it is the ceramist’s fault if they don’t take responsibility for the designs.
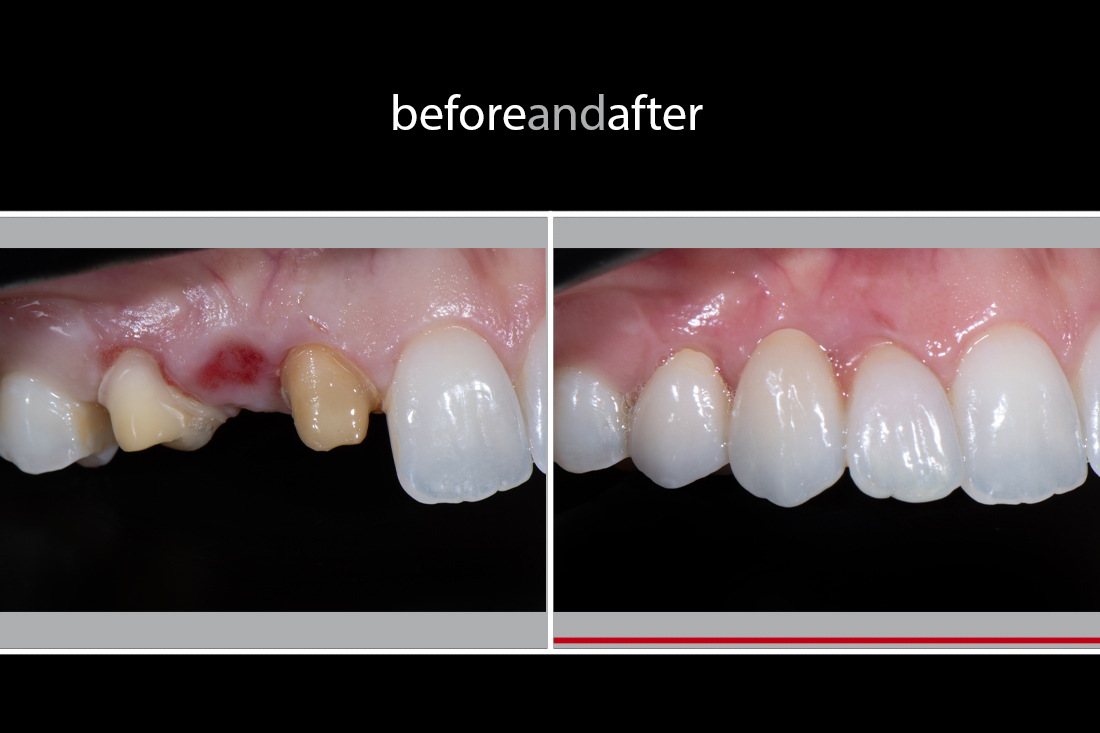
Completed Restorations:


Figs 22-27 show the completed restorations. While we can categorise a case like this as compromised, the result shows that it is possible to achieve an excellent result. The colour matching among Empress Veneers (16-14), Lava Restorations (13-24) and the natural dentition (the rest) came out well. The lower anterior teeth’ colour is A1/A2 base, and the patient wanted slightly brighter – BL4 base – for the final result, hence the upper teeth appear somewhat whiter.
There was some difficulty with the shape, but the ceramist can control the gum condition by applying a suitable emergence profile and necessary contour to regain the gum from the recession. A very firm fit on the pontic was also required. Without having any gum re-contouring, the result is very satisfying.
Feedback from Dr Kaye McArthur, Gold Coast QLD:
Bev’s case presented both Yugo and myself with several aesthetic challenges, most arising because of the drifted root positions of the canines that were now sitting midway between centrals and premolars and positioned differently in each quadrant.
This mid-space presentation required us to camouflage abutments that were midway between the two teeth we wanted to replace. The gaps available made it difficult to correct the smile by creating a more aesthetic golden proportion type of tooth size relationship.
We were lucky that Bev has a relatively low lip line as the ovate pontic bridge style and laser gum re-contouring we would generally prefer to do in anterior cases was unavailable to us because of compromised root position.
Envisaging the final result and precision prepping of the teeth were crucial in providing the space that Yugo needed to create the final restorations for this challenging case.
Bev’s case is typical of many Yugo and I have treated where many practitioners have told the patient that their case is untreatable or cannot be done without orthodontics. Could Bev have had achieved a better result with orthodontic root repositioning first? Maybe? But was she happy with the final result we produced treating this case in ceramics only? Absolutely! The teas and gratitude of a patient who had been afraid to smile for 30 years say it all. That’s why we do what we do.
Feedback from the Patient:

“Dear Yugo and Kaye,
I would like to take this opportunity to truly thank you for the immense effort and expertise you have shown to give me a wonderful new smile.
For many years I have longed to be able to smile without hesitation, and you have made that possible. From being a small child and being teased about the fangs that were once in the front of my mouth, I have never thought it would be possible. For as long as I have been able, I have tried without success, until now, to fix my teeth.
At the age of 14 in the UK, I finally received crowns to cover the “fangs”. It made things better but I always new they weren’t perfect. I was told that it was the vest they could do for me.
Over the years, I never relented my quest for better teeth and have sought other opinions from many other dentists. All of them would come to the conclusion that my case was a “hard job” and that “the results would not be worth the money I would have to spend”. I had almost given up hope and thought that maybe I should “give up the ghost”, until I found you.
The results are amazing! I could not have wished for better; they are beyond my wildest dreams.
I would like to thank you both for having the tenacity, knowledge and sheer “we can conquer anything” attitude to give me back the confidence to be able to truly smile at the world without hesitation for the first time in my life.
Yours Sincerely,
Beverly Jones”
Acknowledgement:
I would like to thank Dr Kaye McArthur for achieving the satisfying result and providing all the clinical photographs. Without her outstanding knowledge and skills in cosmetic dentistry, this article would not have been possible. Many thanks also to everyone who was involved in this article!
References:
Postscript:
This article was initially published in eLABORATE May/June in 2007 as a part 4 of Reproducing Nature series, which I found quite lengthy and irrelevant, so I have omitted some promotional section in the ceramic/porcelain build-up.
The principles I presented in the diagnostic wax-up section remain the same in 2021. I am currently working on a new relevant article focusing on the flow from Smile Design Consultation – Temp Review – Final Review, so stay tuned!


Pingback: Before and After 2012: Smile Makeover - Achieving Significant Change in Proportion - Smile Virtuoso